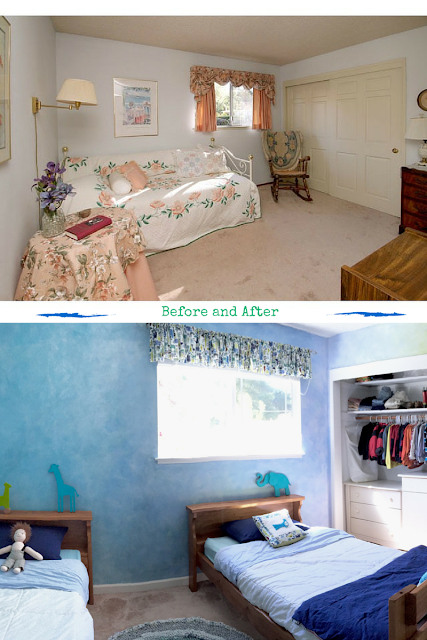
When we bought this house, this room was decorated in a very feminine style, complete with 80’s mauve curtains and accents. It wasn’t what I had in mind for my twin boys’ bedroom. The "before" photo is how it looked (with the seller’s furniture) when we bought the house.
 |
| Before |
After we moved in, with two toddler’s in the mix, the room didn’t look much better!
 |
| During |
It saw some hard days and a lot of playtime. As you can see even the walls were "decorated"! Eventually, I went to work and transformed the room into a Waldorf inspired space for my boys.
 |
| After |
 |
| After |
Wall Color
The method I used for painting the walls is further detailed in my Lazure Tutorial post. But, here is a quick summary:
The first step in creating lazure walls is to start with a bright white base. I like to use off the shelf "ultra pure white" paint.
I'm also careful to use a matte white. This creates the perfect surface for applying the transparent layers of color on the walls.
You will need:
-Water
-Paint brush (standard good quality wall paint brush)
-Bowl
-A soft cloth rag
-Liquid water color paint (I used Stockmar brand)
-In this room, I also used some acrylic paint.
Or you could even try using powdered pigment:
-A pigment binder like this (be sure you use matte):
-Large sponge
White acrylic paint
Mix Your Paint
You want a very thin mixture of color. It should still feel watery, and not thick like regular paint. I didn't measure very precisely. But here is the rough recipe:
-2-3 cups of water
-1/4 cup of polymer binder
-1-2 teaspoons of a single water color paint (you will need to mix up a new batch for each color)
-1 tablespoon of white acrylic paint
Mix well, I used the paint brush for mixing.
The next step is to begin applying the mixture to your walls. It is VERY drippy, so apply only a small amount at a time. I started at the top of the wall, and worked my way down to the floor, so that any drips could be easily wiped up with the rag.
Apply with the brush, using a swirling circular motion. Because I had textured walls I really had to "scrub" the color onto the walls. Then follow up with the sponge, using the same arm motions.
As I moved around the room, I changed the colors, fading one into the next.
Furniture
Then, it was time to add "big boy beds". I knew I wanted beds that could also become bunk beds once the boys were older. But it was difficult to find convertible beds that were identical in size and shape when separated. Luckily, Amazon came to the rescue!
Eventually I will add wall hangings, art and photos in the big empty wall spaces. But that will have to wait until the boys are a little older. Right now they'd just pull anything that they could reach down! So stay tuned for an update in the future :)
Then it was time to add details!
I pulled the colors and theme of the room from this fabric. My mom made the curtains years ago for our first nursery.
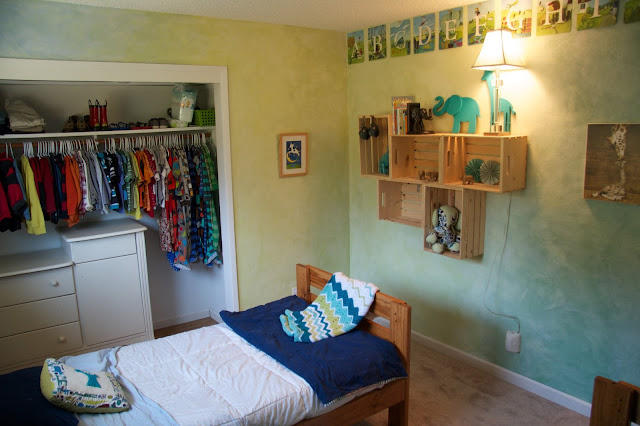
We attached several wooden crates to the wall for storage.
Then I filled the crates with animal themed nicknacks, and other colorful things that matched the walls.
As the boys get older we will be able to add more items.
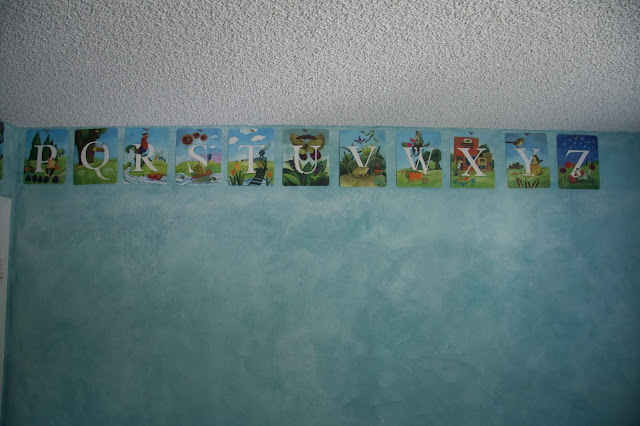
I surrounded the top of the walls with these alphabet wall cards:
They are primarily shades of blue and green, so they match the walls perfectly. The animal theme is also carried through with them.
Again, someday when the boys are older I will add more decor to the wall below them.
For now the decor has to remain pretty sparse, and very kid-friendly.
I found the wooden animals at The Goodwill, and used acrylic paint to make the turquoise. The Waldorf doll is from Etsy. He does have more clothes... somewhere!
Floor
For the floor I collected old sheets from thrift stores and used them to crochet a rag rug.
 To create this rug, I used a combination of this tutorial, and lessons from a friend. It was a time consuming project. But it was nice because it was cost effective, and I was able to chose my own color pallet.
Overall everyone seems happy with the way this room came together. We're looking forward to adding to it more and more in the future!
Before:
After:
Thanks for stopping by!
Linking up to these fun parties:
http://www.skiptomylou.org/2015/06/22/made-by-you-monday-244/http://madincrafts.com/mad-skills-party-264/
http://www.twelveoeightblog.com/2015/06/inspiration-monday-party-red-white-blue-fabulous.html
http://diyshowoff.com/2015/06/21/that-diy-party-49/
http://www.titicrafty.com/2015/06/bewitchin-projects-block-party-103/
http://www.sewcando.com/2015/06/share-your-projects-at-craftastic.html
http://www.thecasualcraftlete.com/2015/06/21/frugal-crafty-home-blog-hop-133/
http://www.gingersnapcrafts.com/2015/06/wow-me-wednesday-211.html
http://www.mygirlishwhims.com/2015/06/your-whims-wednesday-217-and-features.html
http://www.savvysouthernstyle.net/2015/06/wow-us-wednesdays-227.html
http://thenymelrosefamily.com/2015/06/whimsy-wednesdays-173.html/2
http://thehappyhousie.com/work-it-wednesday-4/
http://thewinthropchronicles.com/2015/06/share-it-link-party-172/


