google-site-verification: googlef2ba99a3ab5aecea.html
Showing posts with label Kitchen. Show all posts

Friday, August 19, 2016

Fresh Pasta Sauce For Lazy Cooks

The notion of traditional homemade pasta sauce is so romantic. Thinking about lovely red tomatoes, simmered for hours with fresh Italian spices, is simply delightful. Well, it would be delightful to eat... but (for me) not to make.
Confession: I don't like to cook!
So, when I found my kitchen full of this year's tomato harvest, I knew I'd need to find a few ways to cut corners. If I was going to be motivated to cook with them, I needed a few short cuts!

Enter: Instant Pot pasta sause


After all, they were simply too pretty not to use!
Luckily for me I have two new kitchen gadgets that help speed along the process quite well!

Meet my gadgets:

The Instant Pot and the Stick Blender. These are 2 kitchen accessories that I recommend any cook (lazy or otherwise) add to their arsenal.


Step One:

Simply wash and dice your tomatoes.
There'll be no blanching or removal of seeds here. This is a guide for lazy cooks!


I used a mix of roma tomatoes, and beefsteak. While traditionally, marinara sauce is made with just roma tomatoes, any kind will work.

Then, just toss diced tomatoes into your Instant Pot (see link above). I didn't measure at all, I just kept chopping and filling until I got close to the "Max Fill" line.

Instant Pot pasta sause


Step Two:

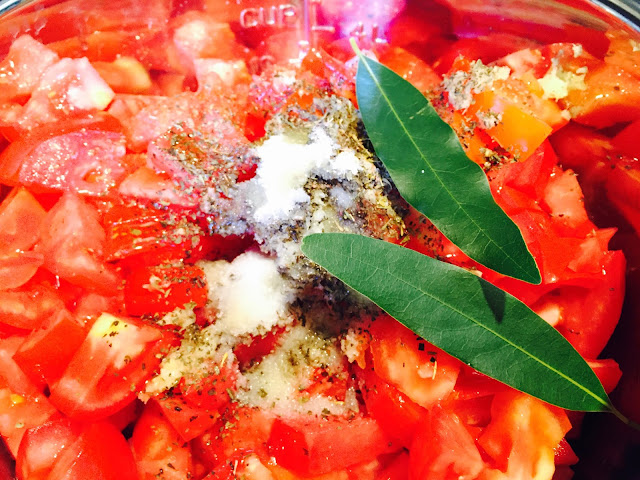
Toss in some flavor. Again, I din't measure anything here (remember: lazy).
I added (what was probably about 2-3 teaspoons of) dried thyme and basil.

Drizzle a (roughly) few tablespoons of olive oil into the mix too.

Also, because I happened to have fresh garlic around I added about 4 cloves of that.


I squished it in the garlic press, but since you'll be using a stick blender later, you probably don't even need to bother with that; just toss 'em in.


If you don't have fresh garlic, a couple teaspoons of garlic powder would work too.


Step Three:

I'm so fortunate, because anytime I want to use bay leaves in my cooking, I just walk out to my backyard and grab a couple off of the huge bay laurel tree growing outside my door. 


If you don't happen to have one of these trees nearby, don't fret, you can also get bay leaves dried in the spice section of your grocery store.

Toss a couple of bay leaves in with all the other ingredients, and add some salt. I put in (about) 3 teaspoons of salt. Be careful with the salt though, don't go overboard. You can always add more salt later if you want to.

Instant Pot pasta sause

Mix it all up with a big spoon and secure the lid of the Instant Pot. 

Then, set your Instant Pot to "Manual/High Pressure" for 10 minutes, Quick release (QR). 

Walk away. Do something else for a while. Bonus points for doing something frivolous!

Now you just let it do it's thing. It will take a little while to heat up, then it will go through the cooking cycle (counting down from 10). 


Once it's done release the steam/ pressure by moving the little lever on the lid. Wait for it to stop steaming and carefully remove the lid.  


Instant Pot pasta sause

Step Four:

Remove bay leaves and discard.

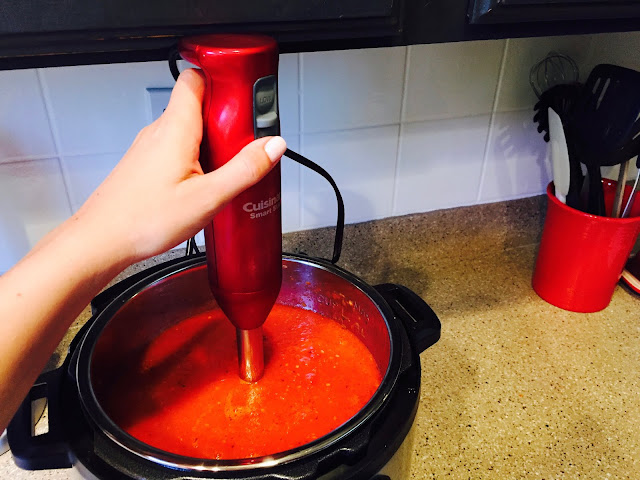
You'll notice that, while it looks beautiful, it doesn't quite look like tomato sauce yet. This is easily fixed. Just grab your stick blender, set it to high and give it some good swirls through the sauce. 

Instant Pot pasta sause

I blended for about a minute. I wanted it to still be slightly chunky, with some larger pieces of tomato remaining. For the most part seeds and skin get mashed up with everything else. And, if a few of these remain, it's all the better because it means you can tell that this is fresh sauce. No jars here baby!

Step Five:

You might notice that the constancy is a bit too watery. No problem! Just dump all of the sauce into a fine mesh strainer. 


Immediately some of the watery part will drain out. Give it a couple of swirls with a mixing spoon to help it along. For even thicker sauce, let it sit for a minute or two. Or, transfer immediately back to Instant Pot (or other) container. 

Stir and serve!


Store in the refrigerator for up to five days, or freeze for later use (up to six months). 
Enjoy, and be sure to brag about how you made this fresh tomato sauce "from scratch"!

That's all, thanks for stopping by!


Linking up to these fun parties:

http://tidymom.net/2016/homemade-after-school-snack-recipes/
http://www.oneprojectcloser.com/creativity-unleashed-link-party/
http://www.mysuburbankitchen.com/2016/08/pinworthy-projects-party-162/#
http://dianarambles.com/2016/08/pin-linky-party-203.html
http://www.avisiontoremember.com/2016/08/the-creative-exchange-august-18.html


Monday, July 6, 2015

Retro Kitchen Redo

When we moved into our last house, the kitchen was (in a word) gross!  But, we made some quick changes (click here to see) and it cleaned up beautifully.

Still, the kitchen felt cramped and oddly arranged.  Overall it was not very user friendly or functional.  So after living with it for about a year, we decided it was time for a complete overhaul.


Before we bought this house, the kitchen had seen some hard days, and apparently a lot of college parties.  But, I love a good project!

Before Photos:

Original "cold storage"; Before


Gas range, before


Refrigerator, before


Now, I am aware that most people probably wouldn't walk into this space and think "Oh my GOODNESS, it's my dream house!" 
But, I did!  I knew that hidden under all of this grime, was a charming beach bungalow (originally built in 1928).  And, I couldn't wait to bring it back to it's former glory!


Kitchen corner, before


Kitchen sink, before


When it was time to remodel and rearrange I set up a temporary "make-shift" kitchen in the laundry room, and we went to work.

The first step was the really fun part. We broke out the sledgehammer, sawzall and a chisel.  Because it was time for:

Demolition!


Take out your frustrations, give a cabinet a good whack with a sledgehammer!
We even re-purposed some of these old cabinets into a playhouse for our children.  For details on that project, see this post.


A note about old houses and with lath and plaster walls (as seen in these photos).  Unlike today's modern sheet rock, traditional plaster crumbles!  Once you start chipping away at it, the whole thing just starts to crumble away.  So, unless you have to remove it because of water damage, it's best to chip with care and caution.   Or, better yet, just leave it alone whenever you can!


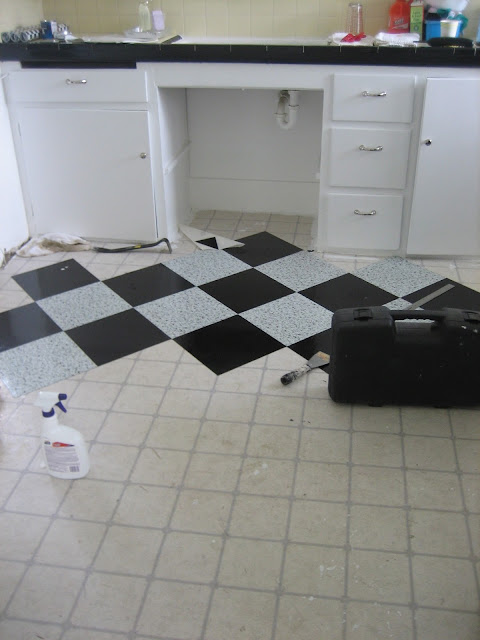
We went over the old linoleum floor with simple peel and stick vinyl tiles. I found the best price for these colors on ebay. They are super easy to install, and easy to replace if an individual one gets too worn.


*Note: We installed the floor about a year before the actual remodel. But, I had purchased extra tiles. So, it was easy to fill in any gaps later, after we removed the original cabinets.

We purchased an old classic range from Craigslist, that was contemporary to the time the home had originally been constructed.  I spent an entire day scrubbing the grossness out of the range (see photo below).


I have no idea what that gelatinous gunk was, but with the help of oven cleaner and a scrub brush, I was able to get it out.  

Here are the products that I had the best success with while tackling the grossness:


And, for brightening dingy chrome surfaces, it works well to scrub them with dry steelwool. 


To really get in all the nooks and under the edges of this stove, I literally used dental tools to scrap out all of the gunk! They were great for the detail work.

I have a friend who's a hygienist, and she gave them to me.  But, it looks like you can buy anything on Amazon these days!  I've been surprised how any times it's been handy to have these little gadgets:


Finally it was time to order new cabinets (prefab white vinyl).  We took careful measurements and a salesperson there helped us with the best possible configuration. They delivered them, and we installed them ourselves.

Then... countertops. Oh, how I wanted the clean smooth finish of granite counters!  But, it simply wasn't in the budget.  

Enter: Budget friendly 12" granite tiles!


They are primarily designed for use on floors or walls, but these tiles also work well on a countertop! We simply took the edge pieces to a local stone and marble shop to have put a "bullnose" (rounded edge) put on them.  Then we on the counter installed them like we would have with any other tile.


I had a lovely granite counter, for a fraction of the cost of a slab!  A small strip of white corner trim under the tiles completed the look.

We moved some plumbing and relocated the sink, so that it looked out over my garden (instead of the parking lot next door), added a small dishwasher, and reused the cabinet hardware I'd found on sale at Restoration Hardware.  

Soon, we had an entirely different kitchen!


After


Range, skink, counters and floors: After


New corner with passthrough, after


After


We stayed with a style that would reflect the age and original charm of the home.  But, also we did so while simultaneously adding in modern conveniences.  Little things like a classic beveled edge subway tile backsplash, a black and white color pallet and red accents brought the space to life.  

It was such a relief to have a shiny, new, and functional kitchen!


For more about this little beach bungalow, and the many changes we made there, please see the following posts:


Thanks for stopping by!


Linking up to these fun parties!

http://www.flourmewithlove.com/2015/07/mix-it-up-monday.html
http://www.pintsizedbaker.com/2015/07/two-cup-tuesday-no131.html
http://www.gingersnapcrafts.com/2015/07/wow-me-wednesday-213.html
http://www.savvysouthernstyle.net/2015/07/wow-us-wednesdays-229.html
http://www.thelifeofjenniferdawn.com/2015/07/a-little-bird-told-me-weekly-link-party.html
http://thenymelrosefamily.com/2015/07/whimsy-wednesdays-175.html/2
http://thehappyhousie.com/work-it-wednesday-with-features-12/
http://thewinthropchronicles.com/2015/07/share-it-link-party-174/
http://thediydreamer.com/from-dream-to-reality/unique-fun-summer-projects-fdtr-175/
http://livelaughrowe.com/delicious-burger-ideas/
http://www.artsyfartsymama.com
http://staceyembracingchange.com/2015/07/09/creative-inspirations-linky-party-146/
http://bloomdesignsonline.com/2015/07/lovely-little-link-party-33.html
http://www.elizabethandcovintage.com
http://www.posedperfection.com/2015/07/creative-ways-link-party-61-and-features.html
http://www.shabbynest.blogspot.com/2015/07/frugal-friday_9.html
http://www.simplysweethome.com/2015/07/friday-favorites-week-276-with-ice-cream-recipes/
http://www.kitchenfunwithmy3sons.com/2015/07/kitchen-fun-and-crafty-friday-link_9.html
http://thecharmofhome.blogspot.com/2015/07/home-sweet-home-228.html
http://www.frenchcountrycottage.net/2015/07/feathered-nest-friday_9.html
http://romantichome.blogspot.com/2015/07/solar-powered-light-up-mason-jar-lids.html
https://easypeasypleasy.com/2018/06/07/funtastic-friday-link-party-182/#more-4285


Sunday, May 31, 2015

Budget Kitchen Makeover

Sticking with my theme of flashing back to our first home (and the changes we made there) today we're visiting my old kitchen.
Don't be too afraid of the "before" photos!


As with the rest of this little house, when we first bought the home the kitchen was disgusting! 
The little two-bedroom had been a student rental, with anywhere from 6-8 men sharing it at one time. It had seen a lot of parties, and very few cleanings (if any)!

But, hidden underneath all of the grime was it's original 1928 charm!

Some "Before" Photos:

Original cold storage "before" 

Stove area "before"

While others were apparently able to function in this kitchen, couldn't! Unfortunately, it wasn't in our immediate budget to remodel this room. But with a little creativity we did make some quick changes.
The very first thing we did was clean! Then, the next step was to paint. I painted every surface except for the tile and the floor. I chose a soft yellow for two walls, and used "ultra pure bright white" (right off the shelf) for the rest.
We were on a budget and I wanted to stick with a retro look, so we decided to go with a checkerboard pattern for the floor.
The most economical and easiest solution was to go over the existing linoleum. I found these peel and stick floor tiles on ebay. They were inexpensive and easy to apply. All you need is a box cutter, straight edge and a clean surface to stick them to.


The next step was a "splurge"on a new refrigerator. Yes, people had been living with this old one:


The old refrigerator was blocking a window, which I didn't want. In order to make room for the new refrigerator in a different location we had to remove one upper cabinet.


Before

After

We purchased the cheapest stainless steel "looking" refrigerator available at Sears. While it wasn't fancy, it did drastically improve the look (and smell!) of the room. We also added simple touches like this reproduction wall clock:


*A side not about the "legs" also pictured above: Yes, I do have nice legs, thank you very much! These came from a friend who used to work at Victoria Secret they were displays). But, these can be yours too, if you have a sense of humor like I do!


The next step was to replace the cruddy old range. The Goodwill was happy to come remove it for us for free. Check your local store to see if they offer this service.
Then, we found a classic used range on Craigslist. It needed some cleaning too!

Before


After

For a more in depth post on this range, and how I made it gleam, please see this post.


To create more storage space in this small kitchen we hung a heavy duty pot rack above the "new" range. In a small space, all possible wall space. Think about adding shelves, racks or even hooks anywhere you can.


Before

After

Using the strip of red tile as my guide, I added red accents. For example, I added the Fiestaware pitcher (see Amazon link below), a curtain on a tension rod (to block the plumbing), and a red butter dish. Then we switched out the old leaky faucet, and painted some of the trim black (where someone had hacked at it with an axe!).


I also replaced the cabinet hardware with drawer pulls I found on sale at Restoration Hardware. It pays to not be too picky, and to shop sales! These were "polished nickel" and while they weren't an exact match to the chrome in the room, they were VERY close.

If you are going for the retro look, another one of my favorite websites to purchase hardware is Rejuvenation.com. Sometimes they also have great sales!


Lastly we added a few flea market finds, like an old breadbox, a chair and a red rolling cart. We also hung these sturdy Ikea shelves.
About a year later we did eventually remodel this room, replacing the cabinetry and making bigger changes. But, I thought it would be important first to show how easily and inexpensively a room can go from "gross" to "cute".
For details on the big remodel of this room, please stay turned for a future post!


Also, for more posts about the transformation of this bungalow, see these other posts:


Thanks for stopping by!


Linking up to these fun parties:

http://thefoleyfam.com/2015/05/sunday-funday-link-up-127-features.html
http://sewmanyways.blogspot.com/2015/05/sew-darn-crafty-link-up-party_31.html
http://www.flourmewithlove.com/2015/05/mix-it-up-monday-blog-party.html
http://carriethishome.com/2015/05/easy-summer-diy-projects-frugal-crafty-home-blog-hop-130/
http://www.raegunramblings.com/2015/05/diy-pillow-cases.html
http://www.sewcando.com/2015/05/junes-first-craftastic-monday-link-party.html
http://www.titicrafty.com/2015/05/bewitchin-projects-block-party-100/
http://diyshowoff.com/category/other/that-diy-party/.
http://madincrafts.com/mad-skills-party-261/
http://www.skiptomylou.org/2015/06/01/made-by-you-monday-241/
http://strangersandpilgrimsonearth.blogspot.com/2015/06/the-art-of-home-making-mondays-please.html
http://myuncommonsliceofsuburbia.com/inspire-me-monday-62/
http://www.abowlfulloflemons.net/2015/06/one-project-at-a-time-june-2015.html
http://www.tipjunkie.com/post/tip-me-tuesday-happy-crafters-share-6-2/
http://cornerstoneconfessions.com/2015/06/titus-2-tuesday-158.html
http://www.sugarbeecrafts.com/2015/06/show-and-tell-link-party-time-12.html
http://thecraftyblogstalker.com/create-link-inspire-linky-party-79/
http://www.carolynshomework.com/2015/06/the-inspiration-board-creative-party.html
http://ladybug-blessings.com/?p=5823

Wednesday, September 24, 2014

Dried Apple Garland Tutorial


For a fun and festive touch of fall, create your own dried apple garland!


A few days ago, I found myself with an abundance of apples, so I decided to make canned applesauce. But, during the process I came up with another idea.
Using slices of apples, I made a dried apple garland to decorate our home.

Before


During

After

Here's the How To:

Slicing

I cut slices directly around the core. So that they would be easier to string I made them pretty thick. They were roughly 1/4" to 1/8' thick. I tried to keep them as uniform as possible. 

I alternated which direction I cut the apples, sometimes slicing them longways (so that to stem remained). Other times I cut from the side, in order to reveal the star shape made by the seeds.

Baking

Then I lined cookie sheets with parchment paper and laid the slices out.


Then I placed them in the oven, on a low 240 degree heat.


While they were baking I used the time to make canned applesauce (link to that post)

The apple slices need to bake for a long time. After about 1 1/2 hours I pulled them out and flipped them all over.


Then I let them bake for about 2 more hours. I checked them periodically to be sure they weren't getting too dry. You want them to still feel a little spongy. If they are too dry, then you wont be able to thread them later, because they will just crack.
Finally, remove the cookie sheets from the oven and allow them to cool for a few minutes.


Stringing

To thread the dried apples together I used a large sewing needle and embroidery thread. 


Tie several knots at the end to keep the apples in place, and gently push the needle through the slices.


Sometimes I alternated between sliced that had been cut longways, and slices that had been cut sideways.


Finish off the end with another couple of knots, hang, and enjoy!


Over time they will slowly dry even more, and soon you will have a beautifully preserved garland to enjoy!


I love the way the sunlight makes the star at the center of the apples glow.


Left-Overs Idea

I ended up with way more dried apples than I needed for this project (I made a lot of applesauce!). But rather than tossing them, I decided to use them in our autumn "nature table" display.


Stack dried slices on wooden plates and trays, or place them in a bowl with acorns for a delightful seasonal display!


Thanks for stopping by!

Linking up to these great blogs:

Tuesday

http://www.pintsizedbaker.com/2014/09/two-cup-tuesday-no91.html
http://thecraftyblogstalker.com/create-link-inspire-linky-party-44/