google-site-verification: googlef2ba99a3ab5aecea.html
Showing posts with label Autumn. Show all posts

Monday, September 26, 2016

Easy (Homemade) Canned Apple Pie Filling

This is the time of year for delicious ripe apples!


They’ve soaked up the last rays of summer sun. Now they wait for us in the trees, delicious, crunchy and sweet!


We had such a great time with friends the other day when we went to a local farm to pick apples! And, while apples kept in the refrigerator can keep for up to many months, I still found myself with an abundance of apples after our enthusiastic picking session.


Photo Credit


One easy thing to do with apples (to make them last all year) is to make canned apple pie filling.
Then store it away for anytime that you want a warm homemade apple pie!
It’s so easy! Just open the jar, dump the apple mixture into a pie crust and bake!


Here’s how I made mine:


Ingredients:

6 lbs apples

3 cups white sugar

1 1/2 teaspoon cinnamon

1⁄2 teaspoon nutmeg

1 cup cornstarch
*or (if you have it) it's better to use: 1 cup ClearJel® (a cooking starch used for preserving)


1 teaspoon salt

2-1/2 cups unsweetened apple juice

1-1/2 cups cold water

1 cup lemon juice (divided into two halves)

About 10 cups water (for sterilizing) 


Materials needed:

You can purchase an entire canning set inexpensively:


Or, if you already have a large pot (tall enough to cover jars with 1" water) then all you will need is the accessories:


Mason Jars (the larger quart size)


Cute Labels:


And, while not necessary, this little gadget will save you a lot of time!


I used Granny Smith and (a few Gala) apples for this project. Generally tart/ green apples work the best for baking.

Also, in case you are not able to weigh your apples, note that 1 pound (of apples) is equal to about 3 medium-sized apples. So, for this recipe you will need about 18 medium sized apples. If your apples are large of small, you can simply adjust the amount accordingly. One nice thing is that it doesn't need to be exact!


Directions:

-Start by sterilizing 6 quart size jars and lids. I just run mine through the dishwasher (on steam setting).

-You can also sterilize by washing them with soap and water and putting them in the oven at 215 degrees (for a minimun of 15 minutes). You can even leave them in the oven until you are ready to take them out. Also, sterilize the metal rims and lid by boiling them for about 5 minutes. Use the metal magnet tool to remove them from the hot water and place a clean surface (like a clean dishtowel).


-Peel apples. For fun, I like to see if I can peel the whole thing in one continuos spiral! For me a small sharp steak knife works the best.


-Next, core and slice apples. Make slices about 1/2 inch thick, or use the tool linked to above. While I worked I sealed, freshly cut apples in plastic bags so that they would not turn brown.


-Blanch apple slices. Working with about 6 cups at a time, submerse apples in a large pot of boiling water and 1/2 cup of lemon juice for 1 minute. Remove with a slotted spoon and keep warm in a covered bowl. This will sterilize them and help prevent browning.


-Combine sugar, cinnamon, nutmeg, cornstarch and salt in large pot (but not the pot you will use for canning later).

-Add cold water and apple juice. Cook on high heat, stirring frequently at first and then constantly until it boils. Let it boil for about a minute, at this point it should be nice and thick. Stir in 1/2 cup lemon juice.

-Add apple pieces, and stir to combine.


-If it won't all fit in the one pot, you can mix more sauce and apples together in a regular mixing bowl. But, ideally you want the apples evenly coated and warmed by the sauce.


-Ladle hot apple pie filling into hot jars, leaving 1 inch headspace.


--Remove air bubbles, one of the tools is made for this purpose. Swirl it around the outer edges of each jar to remove bubbles.

-Wipe rims/ edges with a clean cloth or paper towel.

-Center lids on jars. Apply bands until the fit is fingertip tight. Take care not to over tighten them.


     **An alternate method (I have not tried this) is to NOT mix apples and sauce together first. Instead pack apples in jars and fill jars with sauce just to the bottom rung of the mouth of the jar. Use a wooden spoon to push the apples down. Do NOT fill them any higher! 


-Process jars in hot water bath for 25 minutes. To so this, submerse jars in a boiling water canner (or your large pot, with at least an inch of water above the lids) for 25 minutes, adjusting for altitude as needed.

-Remove jars (using grasping tool) and cool.

-You will know they are sealing when you here the center of the lids make a "pop" noise.

-Check lids for seal after 24 hours. Lid should not flex up and down when center is pressed.
If it pushes down, it didn't seal. I've never had this happen. So far, they always seal right away. But if any of them don't seal, then just refrigerate for up to a few days and use immediately to make a pie.


-To make mine extra cute, I like to first shine the lids and jars with a rag and white vinegar. Then I add a cute label to the lid, writing what it contains and the date. For added flair add a cute bow around the rim too!

-Then store in a cool place (I just use a lower kitchen cupboard) for up to a year and enjoy!


Image Credit
Also, these jars of canned apple pie filling make great gifts! Tie a cute bow around the top and this makes for the perfect festive hostess gift! I like to keep several on hand for the holiday season.

That's all, happy cooking and thanks for stopping by!


If you STILL have apples to use, you might enjoy these other fun tutorials!


Dried Apple Garland Tutorial


Homemade Apple Sauce


Linking up to these fun parties:

http://www.thecasualcraftlete.com/2016/09/25/creative-gallery-199/


Monday, October 26, 2015

DIY Creepy Halloween Haunts

I tried to make non-scary Halloween decorations, but I failed. These things are SO creepy!

At least the kids don't seem to be too afraid of them.


Here's the basics of how I made these easy creepy haunts:

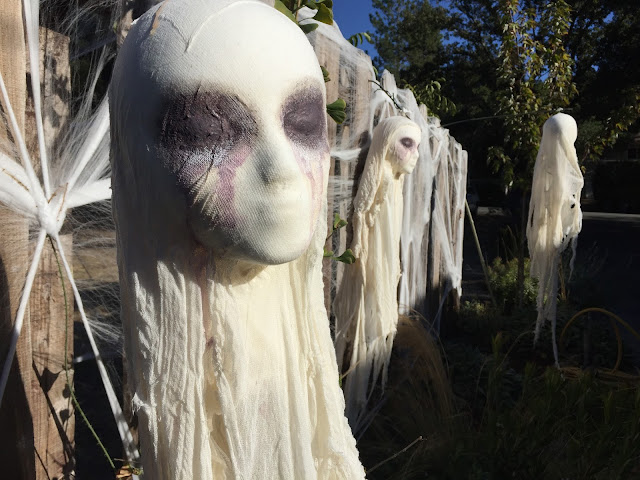
cheesecloth ghost


I came across this tutorial, from Martha Stewart... oh how I love Martha. She calls these creations "Cheesecloth Spirits", which sounded pretty tame to me. Here's what her version looks like:


I decided to give it a try! First I found the wig heads, for much cheaper on Amazon than the sources listed in the original tutorial. Because it's always good to use odd number grouping when decorating, I ordered 3.


I followed the directions on the tutorial, using a mixture of watered down Stiffy, and craft glue. But, it would work just as well with some outdoor mod podge.


To apply it I used a cheap foam brush. You could probably just use a sponge too.


This is a messy job, and you'll need LOTS of cheesecloth. I'd plan on at least several yards per "spirit". Start by placing a piece of cheesecloth over your Styrofoam head, coat with outdoor mod podge.


Continue to layer on more sheets of cloth, ripping the ends to give it an erie look.

But, once these were dry, the looked too plain to me. There wasn't much definition in the face, so I decided to bring more attention to the eyes.

cheesecloth ghost

Using watered down acrylic paint, I added deep purple to the eye area. Because it was so watered down, it dripped down the face and into the folds of the fabric, causing a super erie "bloody tears" effect. You could use blood red, but I prefer subtlety suggestive halloween decorations. Overdoing it on the "blood and guts" always seems like kind of an easy cop-out to me. Subtle is creepier.


But, I have little kids in the house, and they looked a bit too creepy. So I decided to try to tone down the freaky factor a little bit.

cheesecloth ghost

For slight sparkle and texture I applied some mica flake medium that I had on hand.


I also covered up some of the dark purple with plain white acrylic. They were a little less disturbing after this.

cheesecloth ghost

Time for them to find a home!

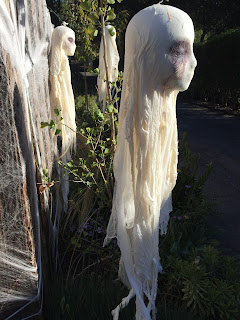
I glued/ screwed white cup hook into the top of each head, and suspended them from small bamboo sticks.


cheesecloth ghost

Be sure you really rip up the cheesecloth at the bottom, so that there is plenty of extra fabric to flutter in the wind.


cheesecloth ghost cheesecloth ghost

I tossed a couple of strands of christmas lights in the bushes bellow these cheesecloth ghosts, because up-lighting is always spooky, and they were ready for fright night!

cheesecloth ghost


Happy Halloween!


Also, if you like DIY decorations as much as I do, you may enjoy this post:


Thanks for stopping by!


Linking up to these fun crafting blog parties:


http://www.flourmewithlove.com/2015/10/mix-it-up-monday-blog-party-without_25.html
http://www.funkypolkadotgiraffe.net/2015/10/too-cute-tuesday-linky-par-tay-256.html
http://myuncommonsliceofsuburbia.com/inspire-me-monday-83/
http://www.tipjunkie.com/post/tip-me-tuesday-happy-crafters-share-10-27/
http://cornerstoneconfessions.com/2015/10/titus-2-tuesday-179.html
http://thecraftyblogstalker.com/create-link-inspire-linky-party-100/
http://www.carolynshomework.com/2015/10/the-inspiration-board-creative-party_27.html
http://ladybug-blessings.com/?p=6329
http://www.gingersnapcrafts.com/2015/10/wow-me-wednesday-229.html#
http://www.mygirlishwhims.com/2015/10/your-whims-wednesday-234-and-features.html
http://www.savvysouthernstyle.net/2015/10/wow-us-wednesdays-245.html
http://thenymelrosefamily.com/2015/10/whimsy-wednesdays-191.html/2#
http://thehappyhousie.porch.com/delicious-fall-desserts/
http://thewinthropchronicles.com/2015/10/share-it-link-party-190/
http://justagirlandherblog.com/hit-me-with-your-best-shot-91/
http://thediydreamer.com/from-dream-to-reality/come-on-over-and-show-off-your-stuff-fdtr-190/
http://www.posedperfection.com
http://bloomdesignsonline.com/2015/10/lovely-little-link-party-49.html
http://staceyembracingchange.com/2015/10/29/creative-inspirations-linky-party-161/
http://www.artsyfartsymama.com
http://www.coloursaturatedlife.com/6-fabulous-fall-decor-ideas-brag-worthy-link-party-3/
http://livelaughrowe.com/around-the-house/


     style="display:block"
     data-ad-client="ca-pub-1259762351787524"
     data-ad-slot="8522386894"
     data-ad-format="auto">


Wednesday, September 24, 2014

Dried Apple Garland Tutorial


For a fun and festive touch of fall, create your own dried apple garland!


A few days ago, I found myself with an abundance of apples, so I decided to make canned applesauce. But, during the process I came up with another idea.
Using slices of apples, I made a dried apple garland to decorate our home.

Before


During

After

Here's the How To:

Slicing

I cut slices directly around the core. So that they would be easier to string I made them pretty thick. They were roughly 1/4" to 1/8' thick. I tried to keep them as uniform as possible. 

I alternated which direction I cut the apples, sometimes slicing them longways (so that to stem remained). Other times I cut from the side, in order to reveal the star shape made by the seeds.

Baking

Then I lined cookie sheets with parchment paper and laid the slices out.


Then I placed them in the oven, on a low 240 degree heat.


While they were baking I used the time to make canned applesauce (link to that post)

The apple slices need to bake for a long time. After about 1 1/2 hours I pulled them out and flipped them all over.


Then I let them bake for about 2 more hours. I checked them periodically to be sure they weren't getting too dry. You want them to still feel a little spongy. If they are too dry, then you wont be able to thread them later, because they will just crack.
Finally, remove the cookie sheets from the oven and allow them to cool for a few minutes.


Stringing

To thread the dried apples together I used a large sewing needle and embroidery thread. 


Tie several knots at the end to keep the apples in place, and gently push the needle through the slices.


Sometimes I alternated between sliced that had been cut longways, and slices that had been cut sideways.


Finish off the end with another couple of knots, hang, and enjoy!


Over time they will slowly dry even more, and soon you will have a beautifully preserved garland to enjoy!


I love the way the sunlight makes the star at the center of the apples glow.


Left-Overs Idea

I ended up with way more dried apples than I needed for this project (I made a lot of applesauce!). But rather than tossing them, I decided to use them in our autumn "nature table" display.


Stack dried slices on wooden plates and trays, or place them in a bowl with acorns for a delightful seasonal display!


Thanks for stopping by!

Linking up to these great blogs:

Tuesday

http://www.pintsizedbaker.com/2014/09/two-cup-tuesday-no91.html
http://thecraftyblogstalker.com/create-link-inspire-linky-party-44/