google-site-verification: googlef2ba99a3ab5aecea.html
Showing posts with label Design. Show all posts

Thursday, May 31, 2018

Update Your Above Ground Pool


The lazy days of summer are upon us, and I am so excited! It's my very favorite time of year, and a great reason to embark on a fun outdoor project.


Hayley Brentmar

One of summer's greatest pleasures is splashing around in the cool waters of a swimming pool. We can't put in an in-ground pool, so instead we chose to go the "above ground" route.

Unfortunately because of the nature of their design, above ground pools can be a bit of an eyesore!

Not a pretty sight!

However, I was determined to enjoy the fun of having a pool, without the "ugly" factor. So, with a small budget and a creative vision, I was able to transform an ordinary plastic pool into a welcoming tropical oasis.


Here's how I did it:

Start with a framed above ground pool. I did a lot of research and decided on this one:


The price on this pool was great, and the reviews were quite good overall. Plus the size was right. I wanted something deep enough that my kids could still swim underwater, but not too large for our yard. Set up was pretty easy and the whole family had fun putting it together.

Here are the additional supplies I ordered for the pool. I also carefully researched all of these products and have been happy with them.


Start by setting up your pool on level ground. I opted to put a tarp under ours. We simply folded the corners of the tarp underneath the pool during set up so that it wouldn't show.


First things first... Cover up that ugly plastic side of your pool!

To disguise the sides, I wrapped our pool in inexpensive willow fencing. This is the kind I used:


I ordered it in the 4ft height. Don't be scared off by the reviews of this! Yes, it is true that it is pretty flimsy and see through. But that is easily solved!

First of 3 layers

To compensate for the quality, I ordered enough rolls to go around the circumference of my pool 3 times. When you layer this fencing it looks great! It was also easy to secure using brown zip ties. 


The fencing was a little taller than the edge of the pool, so I went around and trimmed off the top using a pair of garden sheers. But, any heavy duty scissors would work.

Next:

I decided to add some color and cheer with flower pots.
Because buying new glazed pots wasn't in my budget, I got creative. I gathered a group of large mismatched planters and decided to give them a colorful makeover.

Before

First, I covered them completely (inside and out) with a layer of primer. The primer will help block moisture and aid in protecting the pot's color from the elements.

During


This project took just under two cans of primer. I applied thick layers and let them dry for a couple of hours.

Then I chose a variety of colors in a cheerful palette. I mixed and matched different brands of spray paint and was sure to select paints formulated for outdoors.


Then it was time to paint the pots! Most of them took at least two coasts of paint. Then for good measure I covered each one with an additional protective clear coat.  I was thrilled with how well they turned out!

After

Then it was time to add the fun stuff!

I LOVE flowers and plants, and I had a wonderful time selecting things to go in these pots. While shopping for plants I was careful to keep my color theme in mind.
I also wanted to add some plants that looked "tropical". Unfortunately were we live it can drop below freezing in the winter, so I can only use cold hardy plants. Luckily there are some tropical looking plants that can stand the cooler temperatures. Here are some ideas:

-Agapanthus
-Cannas
-Cold Hearty Banana Plants
-Cold Hearty Queen Palms

Hayley Brentmar


Don't forget to add a fun garden trinket or two! These worked perfectly for me:


Hayley Brentmar


For a soft landing and to help keep debris out of the pool, consider using a door mat on the ground at the entrance to your pool.

Add in a few more fun accessories and you'll be ready to swim! Here are a few more ideas:

Keep cute towels handy and dry with nearby hooks. I found both in my color scheme on Amazon.


Because the fencing can be a bit rough and because I wanted my kids to be able to get into the pool without help, I also added this small ladder.


It's super easy to take in and out as needed, and luckily it comes in a subtle gray color.


Hayley Brentmar


And don't forget to add some fun pool toys!


Lastly, I updated our old picnic table to match the rest of the decor. Please stay tuned for a "how to" tutorial post about this project soon!


Hayley Brentmar


Hayley Brentmar


Thanks for stopping by; I hope you summer is off to a great start!


Hayley Brentmar


Thanks for stopping by!


Linking up to these fun parties:
http://www.simplysweethome.com/2018/05/friday-favorites-linky-party-week-427/
https://www.chiconashoestringdecoratingblog.com/2018/05/flaunt-it-friday-405.html
https://thecharmofhome.blogspot.com/2018/05/home-sweet-home-370.html
http://www.meetourlife.com/2018/06/nifty-thrifty-sunday-337/
http://www.thepinjunkie.com/2018/06/pin-junkie-pin-party-268.html
https://www.coffeewithus3.com/pretty-pintastic-party-212/
https://easypeasypleasy.com/2018/06/07/funtastic-friday-link-party-182/#more-4285
http://www.annanuttall.com/anna-nuttall-bloggers-links-up-88/
http://www.answerischoco.com/2018/06/bff-open-house-link-party.html
https://lifewithlorelai.com/2018/06/07/fathers-day-ideas-dad-hm-187/
https://www.pamspartyandpracticaltips.com/2018/06/dare-to-share-317.html
http://www.ourminifamily.com/2018/06/our-mini-linky-party-week-179.html
http://piecedpastimes.blogspot.com/2018/06/saturday-sparks-link-party-274.html
https://www.thesitsgirls.com/sharefest/june-8th-saturday-sharefest/
http://www.create-with-joy.com/2018/06/inspire-me-monday-week-336.html
http://jembellish.blogspot.com/2018/06/a-round-tuit-418.html
https://mypinterventures.com/sentimental-diy-fathers-day-gift-ideas/
https://www.themodestmomblog.com/modest-monday-and-a-link-up-229/
http://www.lifeoffaithblog.com


Monday, September 12, 2016

Just Add Color

Latley it seems like there is used patio furniture for sale everywhere!
Summer isn't officially over until the 22nd, so there is still have time to enjoy the outdoors. Luckily, even if it's a bit weathered, used patio furniture is easy to update!

spray painted furniture

First, I gathered up several pieces of worn wicker furniture.


I chose peices that were all made of the same material (wooden wicker). But you could also update multiple pieces of furniture made from different materials as well. As long as you paint everything with corresponding colors, you can mix and match metal, wood, and even plastic furniture. The great thing about the paint that we'll use is that it sticks to just about everything!

If you do go with wicker, check to be sure that it isn't unraveling or broken. Usually the first place you'll notice damage is on the legs. If it's starting to unravel, skip it. But, don't worry about chipped/ faded paint. We will fix that part!


Next, I used 100 grit sandpaper to lightly and quickly remove flaking paint, dirt and spider webs from each piece. Just a quick once-over was enough to remove the worst of it. You don't need to completely sand everything off, just aim for the loose bits.


Now the fun part!

Work outdoors, and cover an area about twice the size of your furniture with a protective surface (to avoid painting your patio too). I like to use old cardboard for this purpose. If you have an "Amazon habit" (like I do) then you probably have no shortage of boxes laying around! But you can also use drop cloths or even old sheets (tip: check your local thrift stores for great deals on sheets!).


Next gather your paint. Here is what I used for this project:

For the largest chair, I used three cans of Rustoleum "Oasis Blue" spray paint. I like the "paint plus primer" (called "2X") because it is durable and easy to use. Wicker tends to soak up a lot of paint, so have multiple cans ready.
If your chair is solid wood or plastic, then you can likely get by with only two cans. 


Next, for the child size rocking chair, I used one whole can of the same brand of paint. This time I used the "Magenta" color. One can was just enough to cover the chair because it was already red.


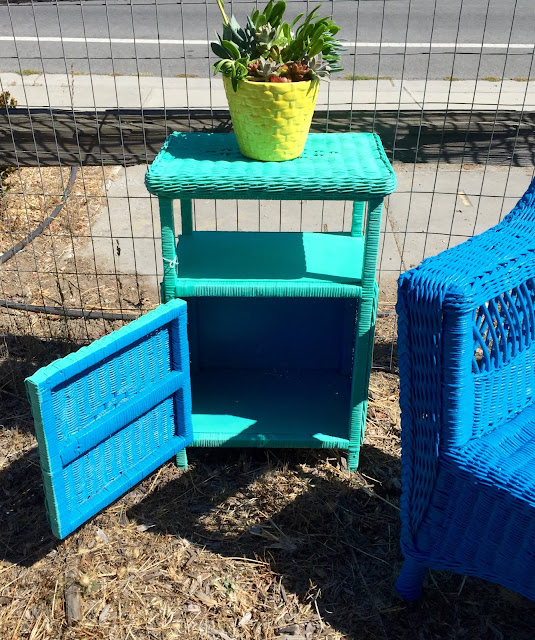
Lastly, I used a different brand of paint for the side table, because I liked the way that the color looked with the other two.
This time I used Krylon Paint and Primer in "Sea Glass".  It took about 3 cans to completely cover piece (inside and out). The coverage wasn't quite as good as the Rustoleum (I had to do one more layer), but the hue looked great with the other two colors I had chosen.


You can use a glossy finish if you like, but I prefer a satin finish. Matte (satin) finishes have a more sophisticated look and tend to hold up better over time.  


I started painting each piece upside down first. To avoid drips, use a quick sweeping motion, holding the can about 9" away from the furniture.  
Starting with the bottom will give you a chance to "feel it out" and get an idea of how to best apply the paint. And, being that the bottom won't really show, painting the underside first tends to be more forgiving of mistakes and/ or drips. Once you feel confident in your technique, flip the chair over and paint the top.  

spray painted furniture

I like to really saturate my wicker furniture with paint, so I added 3 (and in some places 4) coats of paint. Take care to notice if you are getting small areas like edges, corners and legs. It can be helpful to paint each coat from a different angel, to assure good coverage.


spray painted furniture


Once covered in paint, allow your furniture to dry completely.  

spray painted furniture
Spray painted furniture 

For a unique twist, I painted the inside of the table blue, and the outside green. This makes for a fun surprise when the little door is opened.
Add a colorful pot of (easy to grow) succulents to the mix and you will have a fresh set of furniture that's perfect for cheering up any space!  

spray painted furniture

Lastly, at the end of this project my right hand was tinted blue from the overspray. Luckily I have figured out the best way to get any paint off of your hands is to use this product:


It can also help scrub it onto your hands with one of these:


It works like a charm every time, and smells so heavenly!


Before and After

Sometimes I like to use painted patio furniture inside the house for an unexpected pop of color. It's also lovely on a porch, patio or lawn.

Sit back, relax and enjoy!

Before

spray painted furniture
After

That's all for today! Thanks for stopping by, and happy painting!

spray painted furniture
Add caption


Linking up to these fun craft parties:


Saturday, August 6, 2016

Homeschool Room Tour


The long lazy days of summer will be winding down soon.  And, as much as I'd love to just lay back and mindlessly soak in the sunshine, thoughts of the school year ahead are drifting into my mind.

September is just around the corner!


This is the time of year that many homeschooling parents begin to think about how we arrange our space. So, in the spirit of a new academic year, I present a tour of our homeschool room!

I have also added direct internet links to the various items I have around the room, so that you can easily add them to your space if you wish..
Also, because I love "before and afters," I included some photos the original space originally when we bought our house (about two years ago).

Climb the stairs and join us! Welcome!

Stairs, before


On your way up the staircase, you will see a few bulletin boards as well as vintage inspired maps and scientific diagrams. To keep the space warm and welcoming, I use natural materials and subtle colors. 


The "posters" are actually intended to be wrapping paper, but they work great as decor on the walls! I love their classic look and soft colors. I found ours at a museum gift shop, and Amazon carries a lot of them too (here are just a couple of examples):


As soon as you round the corner at the top of the stairs and enter the space, you'll see where we do the bulk of our work. 
We spend the majority of our time at the sturdy vintage table. It was a lucky flea-market find that's held up to 3 kids really well! 

waldorf homeschool room

I am fortunate to have a large space that I can dedicate just to homeschooling. I know that not everyone does. When I first started homeschooling all I had was a desk in our entryway! So if you don't have a whole room, please know that I understand what that's like too (and be sure to check out the folding furniture I will discuss below).
Part of what sold me on the house we're in now was the potential of the upstairs space. This big room now doubles as both a place of learning, and a family room.

waldorf homeschool room

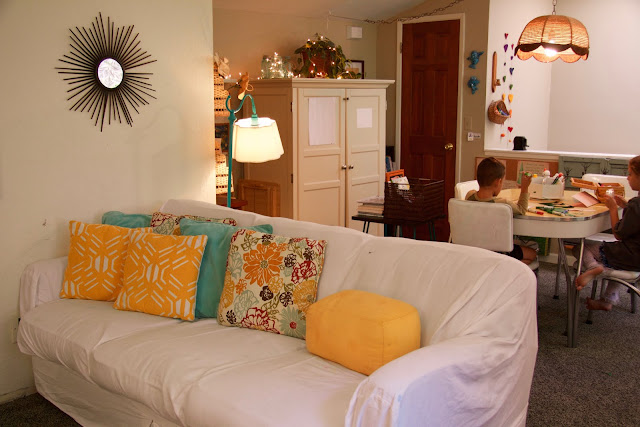
As you can see in the photo above, about half of the room functions as a comfy area to relax. We enjoy sitting on the couch to do our reading.

family room

And, the kids like to watch movies here (a TV is intentionally hidden in the armoire pictured below).

family room

I've tried to make the space welcoming, yet versatile too. I particularly like the chairs and table in this little conversation area because they fold, and are easily collapsed and moved out of the way. This is very helpful when (for example) you get a really good game of "ring around the rosie" going!


Having folding furniture is great if you are short on space too! I get everything from Amazon these days! Her are the exact chairs and tables I have:


I also really like this wall mounted murphy desk, because it can also be folded up to make room for extra floor space.

waldorf homeschool room


And, speaking of things that can be hidden away...  I disguise many unsightly things in the big white cabinet.
When the doors are open, it's actually a computer desk! I love that I can close the doors and hide things like the printer and the laminator (both things I love to have, but that I don't love to look at).
I found this particular one on Overstock.com. 

waldorf homeschool room

I love curriculum, books and educational materials. As a result I have stock piled WAY too much of it. Between my days in college earning my teaching credential, my years as a reading intervention teacher and now as a I enter my 4th year as a homeschooler, I have managed to acquire quite a collection!


Someday I fully intend to sort through my stash, and hopefully get rid of  lot of it. But, for now it all stays with us, suspended in state of "organized" chaos.  
Books and curriculum that are not in regular use are stored in the closet.  Meanwhile, the resources that are in regular rotation stay in a simple cube shelf next to my desk.

waldorf homeschool room
I love having over-the-door shoe rack inside the closet door (pictured above). It is a great way to store small things like art supplies, pencils (and so on). I love that it is made of natural material (and not cheap plastic). But, my only regret is that I didn't get one with clear pockets, like this:


The cube shelf is something that you can find at just about any big box store, or online. You can also get canvas bins made to fit in the cubes which are nice to have. Mine is similar to this...


I like that the back isn't solid because I can have access to the electrical outlet behind it.

And, speaking of storage, I still have two "littles" in the mix, who don't have very long attention spans! So, I keep a stash of puzzles and busy bags on hand for them to use while I work with my oldest. They are all easily accessible, while simultaneously stored out of sight in a wooden (Ikea) shelf. 


The puzzle rack on the top right has been a life saver. I like that it's easy for my kids to clean up the puzzles themselves, and that it's made of natural wood. This is the one I have: 

`

No children's' space would be complete with a little bit of whimsy. I've added this throughout the room with simple additions like lighting, wool felt garlands, and more.


I LOVE lighting. It can really make or break a space. One way that I brightened up a dark corner of this room, was by draping string lights over a shelf bracket mounted on the wall. The trick to this is, to use lights with a white cord (not a standard green one).


For an easy on/off situation with my collection of lights, I have everything plugged into switches. 


But, any power strip (with a master switch) will do. You'll be more likely to use all the lighting if it's easy to turn it all on at once!

The element of subtle whimsy continues as you move through the room...


I am very inspired by Waldorf education, and incorporate elements of this theory into my homeschooling (like with the "math gnomes" pictured on the bulletin board below). 


I was an Art major in college, so I still have a lot of my old supplies. Plus we enjoy crafting and creating. So, here are some photos of how I keep all the gear, supplies (and, let's face it... "the mess") corralled.

 
Luckily the back section of the room even has a linoleum floor for easy clean up!


You may notice (in the picture above) my solution to having a place for works of art to dry. When I looked for drying racks, all that I could find were giant racks made for entire classes' worth of work. So, instead I use a wooden shoe rack, and it works great! 


Also, Ikea's easel is just as good as the more expensive versions!

And, in closing I'll leave you with a few more "Before and Afters" just for fun.

Before

After


Before


After


Before


After

I hope that you feel inspired after scrolling through this post! Please feel free to leave me any comments or questions you have. Also, if you do a post on your homeschool space please leave a link. I love peering into the spaces that others have created!


That's all! Thanks for stopping by!


Linking up to these fun parties and round ups:

http://www.flourmewithlove.com/2016/08/mix-it-up-monday.html

SaveSaveSaveSave