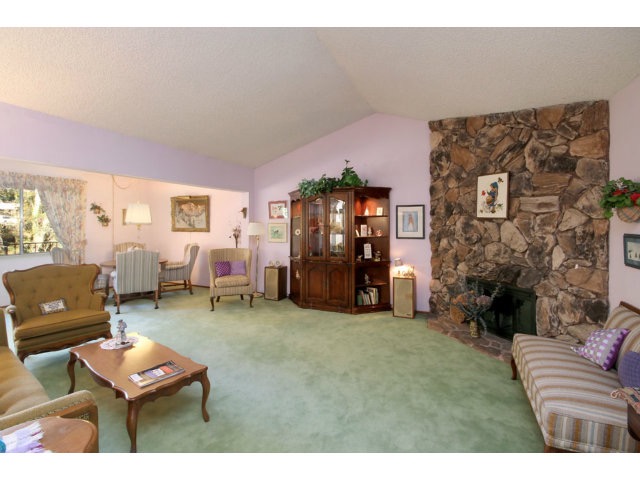
In our new house, that "thing" was an unfortunate shade of mint green carpet.
When bought our house the walls were pink, and the carpet was green (my husband nicknamed it "pistachio").
Staying within our redecorating budget meant that the carpet had to stay. But there were aspects of the space that we could change.
Grey is a popular color in interior decorating right now. So, to update the space, I added a trendy midcentury modern style couch, in a rich warm grey.
I was pleased to find this sofa at CB2 (an affiliate of Crate and Barrel). Both Crate and Barrel, and CB2 are excellent sources for reasonably priced, midcentury modern inspired pieces.
Next, I painted the walls using my favorite go-to paint: Benjamin Moore, #925 (the perfect warm white).
We purchased the two accent chairs from the previous owner, and had them reupholstered. To see "before and after" images of these chairs click here.
 I found inexpensive throw pillows in perfect coordinating colors at Target, and added them to the seating areas.
Eventually we will replace the carpet with wood. But in the meantime, we have an updated and comfortable space to enjoy.
 |
| Before |
When bought our house the walls were pink, and the carpet was green (my husband nicknamed it "pistachio").
 |
| Before |
Staying within our redecorating budget meant that the carpet had to stay. But there were aspects of the space that we could change.
For example, we knew that we could paint, bring in new furniture and add natural light. By making these feasible changes, we could still update the room with a fresh new feel.
To start, I created a Pinterest board where I began to gather ideas and inspiration. Using everything from wedding cakes to clothing as inspiration, I gathered images of visually pleasing color combinations featuring mint green.
To start, I created a Pinterest board where I began to gather ideas and inspiration. Using everything from wedding cakes to clothing as inspiration, I gathered images of visually pleasing color combinations featuring mint green.
Shades of green look lovely and modern when paired with red. Green and red are considered "complementary colors," so they tend to go well together.
Grey is a popular color in interior decorating right now. So, to update the space, I added a trendy midcentury modern style couch, in a rich warm grey.
I was pleased to find this sofa at CB2 (an affiliate of Crate and Barrel). Both Crate and Barrel, and CB2 are excellent sources for reasonably priced, midcentury modern inspired pieces.
 |
avec sofa |
Next, I painted the walls using my favorite go-to paint: Benjamin Moore, #925 (the perfect warm white).
We also added three inexpressive sun tunnels into the ceiling. Sun tunnels are a budget friendly alternative to traditional skylights, and they will flood your space with natural light.
We purchased the two accent chairs from the previous owner, and had them reupholstered. To see "before and after" images of these chairs click here.
 I found inexpensive throw pillows in perfect coordinating colors at Target, and added them to the seating areas.
I also purchased a grey "poof" for extra seating, and painted the dated fireplace white.
Then I added red curtains that echod the modern color pallet.
To give the illusion of larger windows and let in the most light, always hang your curtains so that they rest directly in front of the wall to either side of the window (the idea is to hang them so that they don't actually cover any of the window itself when they are open).
Eventually we will replace the carpet with wood. But in the meantime, we have an updated and comfortable space to enjoy.
 |
| Before |
 |
| After |
Thanks for stopping by!
Linking up to these fun parties:
http://www.simplysweethome.com/2015/10/friday-favorites-week-289/
http://chiconashoestringdecorating.blogspot.ca/2015/10/flaunt-it-friday-276.html
http://www.oneprojectcloser.com/creativity-unleashed-link-party/
Linking up to these fun parties:
http://www.simplysweethome.com/2015/10/friday-favorites-week-289/
http://chiconashoestringdecorating.blogspot.ca/2015/10/flaunt-it-friday-276.html
http://www.oneprojectcloser.com/creativity-unleashed-link-party/
http://www.justusfourblog.com/2015/10/pinworthy-projects-party-121/
http://thecharmofhome.blogspot.com/2015/10/home-sweet-home-241.html
http://www.dianarambles.com/2015/10/pin-me-linky-party-158.html
http://www.niftythriftythings.com/nifty-thrifty-sunday-217/
http://cornerstoneconfessions.com/2015/10/titus-2-tuesday-177.html
http://www.tipjunkie.com/post/tip-me-tuesday-happy-crafters-share-10-13/
http://www.carolynshomework.com/2015/10/the-inspiration-board-creative-party_13.html
http://myuncommonsliceofsuburbia.com/inspire-me-monday-81/


