google-site-verification: googlef2ba99a3ab5aecea.html
Showing posts with label Home Improvement. Show all posts

Friday, October 9, 2015

Working With Ugly Carpet

Sometimes, working with a modest budget means that there are parts of your home that you simply can't change.  In other words, sometimes there are things that you just have to work with.  
In our new house, that "thing" was an unfortunate shade of mint green carpet.  

Before

When bought our house the walls were pink, and the carpet was green (my husband nicknamed it "pistachio").

Before

Staying within our redecorating budget meant that the carpet had to stay.  But there were aspects of the space that we could change. 

For example, we knew that we could paint, bring in new furniture and add natural light.  By making these feasible changes, we could still update the room with a fresh new feel.

To start, I created a Pinterest board where I began to gather ideas and inspiration.  Using everything from wedding cakes to clothing as inspiration, I gathered images of visually pleasing color combinations featuring mint green. 


Shades of green look lovely and modern when paired with red.  Green and red are considered "complementary colors," so they tend to go well together. 


Grey is a popular color in interior decorating right now.  So, to update the space, I added a trendy midcentury modern style couch, in a rich warm grey.

I was pleased to find this sofa at CB2 (an affiliate of Crate and Barrel).  Both Crate and Barrel, and CB2 are excellent sources for reasonably priced, midcentury modern inspired pieces.

avec sofa


Next, I painted the walls using my favorite go-to paint: Benjamin Moore, #925 (the perfect warm white). 

We also added three inexpressive sun tunnels into the ceiling. Sun tunnels are a budget friendly alternative to traditional skylights, and they will flood your space with natural light. 


We purchased the two accent chairs from the previous owner, and had them reupholstered.  To see "before and after" images of these chairs click here.


I found inexpensive throw pillows in perfect coordinating colors at Target, and added them to the seating areas.
I also purchased a grey "poof" for extra seating,  and painted the dated fireplace white.


Then I added red curtains that echod the modern color pallet. 

To give the illusion of larger windows and let in the most light, always hang your curtains so that they rest directly in front of the wall to either side of the window (the idea is to hang them so that they don't actually cover any of the window itself when they are open). 


Eventually we will replace the carpet with wood.  But in the meantime, we have an updated and comfortable space to enjoy.
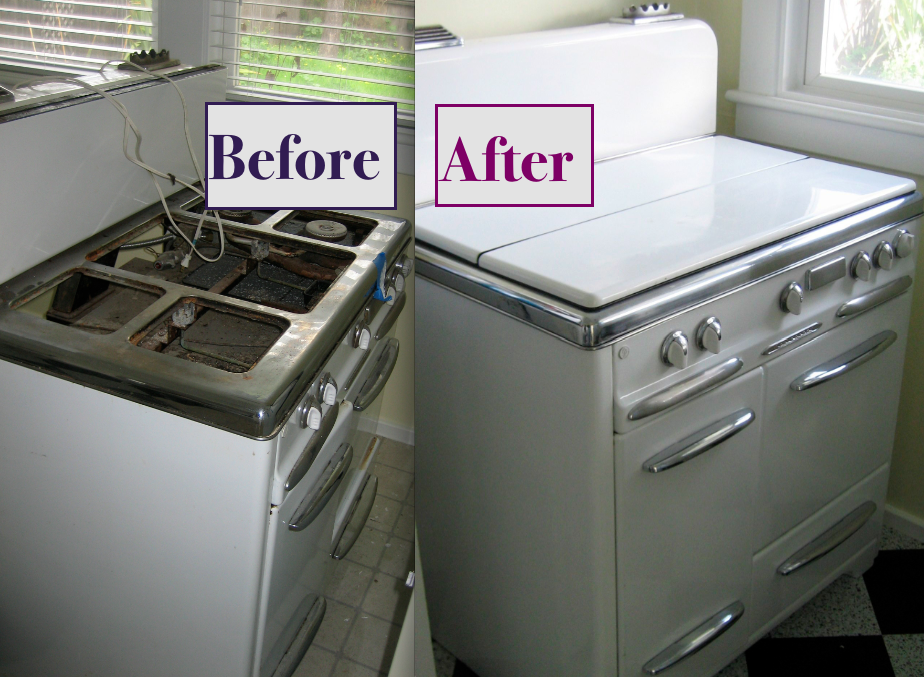
Before

After


Thanks for stopping by!


Linking up to these fun parties:

http://www.simplysweethome.com/2015/10/friday-favorites-week-289/
http://chiconashoestringdecorating.blogspot.ca/2015/10/flaunt-it-friday-276.html
http://www.oneprojectcloser.com/creativity-unleashed-link-party/

Thursday, July 30, 2015

Budget Bathroom Remodel II

When we bought our house, I knew that I would eventually change many aspects of the home, this bathroom included. Then a plumbing leak mandated that it was time to dive into a bathroom makeover!


As with every house project I take on, my aim was to keep costs low without sacrificing style.
Because of the plumbing problem however, this time it would have to be an actual "remodel" (as opposed to the cosmetic changes I made with much of the rest of the house).
Basically, I couldn't just cover up tattered surfaces surfaces this time, everything actually had to come out!


First Things First; Wallpaper

Now, don't get me wrong, I LOVE birds...But I don't love them on old peeling wallpaper. It had to go.


The best method for removing wallpaper:

-First, I pulled off any paper that was already loose using just my hands.  Luckily I was able to get most of the top layer off this way.
-Second, I made a mixture of 2 parts hot water, 1 part liquid fabric softener, and 2 parts white vinegar.
-Third, I used a rag to liberally apply this mixture to the wall.
-Last, (after letting the mixture sit for a few minutes) I used a paint scraper to scrape off any remaining glue and paper.

Removing wallpaper is never an easy job, but it's worth the pay off!  If you have kids, put them to work too. Mine LOVED taking the paper off the walls!


Demolition

This is pretty self explanatory. 
Chip away old tile, cut away wood rot and remove any moldy sheetrock. This is a fun way to put your trusty sledgehammer to use!


We had to take it down to the studs and floor joists in some places due to water damage. However, if the "bones" of your bathroom are still in good condition, you can probably get away with leaving the sheetrock and subfloor.  Just be sure to check the shower pan, they can be a common place for leaks.


Add In The New

Before too long it was time for to start adding new elements back into the room. We started with the tub.
The old tub was shot, so we opted for a new cast iron tub that is wider and taller than the old one. 


It was super heavy, and getting it into the space wasn't easy, but they did it! Next up, tile...


Tile Tub Surround

Since I wasn't too keen on the "before" tile, we went with something different. 

Tile Before

Close up of tile "before"

To keep costs low we selected large subway tile. Subway tile is an instant classic, and is relatively inexpensive.  Also, because I selected oversized tile, it used less labor time (helping to keep costs lower and/ or saving you time).  

For a dramatic feel, we ran the tile tub-surround around the window, and all the way up to the ceiling.


After

We just went with "ice white" from Home Depot. It was cheap and easy!  Then we finished off the clean look with a self sealing white grout.

After

Soon it was time for the floor. 

Flooring

The original bathroom floor was tile. But the subfloor underneath was rotten, so it had to go.  If you would like to salvage your tile floor, but don't like the color, try painting it! (See link below for product info). It works miracles! I had used it on this floor the year before, to disguise the old tile.


(Painted) Floor Before

Again to keep costs low we went with an inexpensive and easy to install floor. The very cheapest flooring option in a single slab of laminate, but I don't care for that look. So instead we went a step up and used a self adhesive "snap together" flooring. 


After

*Also note that, even small changes like the updating the color of the metal strip between the carpet and bathroom floor (from gold to silver) can update a house.


This type of floor comes in many different patterns and colors, including some convincing synthetic wood grains. However, because I knew that someday we'd be putting wood in the ajacent hallway, I didn't want bathroom flooring that would clash with wood, or look "too close" to wood.  So we chose a grey cement/ slate finish. 


This floor went in quickly and easily. After installation we were careful to calk every corner or seam that was near a water source. This is very important, especially if you have kids like mine, who enjoy splashing in the tub!

A New Vanity

Because we needed to select everything in just one shopping trip (the one day that we had a babysitter!) we also ordered the vanity from Home Depot.  I did see it for a little less elsewhere though (including on overstock.com)


Old Vanity, Before

I wanted to be choosy about the countertop, we chose a model that didn't come with a top. But, many do come with a top and sink all ready to go, and they are quite nice. To save on labor costs measure carefully and do your best not to have to move the plumbing. 


After

I chose a single facet (instead of one with handles) with sleek lines.  A streamlined faucet is easier to clean and makes the space feel modern.


Before

After

I went with a brushed nickel finish. Oil Rubbed Bronze hardware is lovely.  But it's very trendy right now, and I think it is more likely to eventually look dated than classic chrome or nickel. 
For continuity, ensure that all of the hardware in your bathroom is made from the same metal (drawer pulls and light fixtures, and faucets).

Adding in More Elements

Both the light fixture and the mirror were original.  They were circa 1972, so they were not quite old enough to be back in fashion again.  They had to go!


Before

We chose a nice new light fixture that matched the rest of the hardware and installed it in the same location.


After

I found an inexpensive beveled edged mirror at a discount store (Ross) for about $40. The frame was gold, so I painted it with matte finish chalk paint (find the cheap brand here, or the original chalk paint here).


Before

We also replaced the old shutter style medicine cabinet with a new mirrored one.  Mirrors are always your friends! They read like a window, brightening and enlarging any space.  So it can be beneficial to use them whenever possible! 


After


After

Just one thing to keep in mind... open the package and check your mirror before leaving the store. We had to exchange this one because the first one came with a chip. This is the second time that has happened to me with a Home Depot mirror. 

Keep it Simple

I like to change up my decor often. So, as you can see from these photos, the most costly changes we made in the bathroom are all subtle in their coloring.  We used a lot of white.  This way I can easily add color with things like towels, shower curtains and rugs.  These are simple things to switch out if I decide that I eventually want a different look.  Fresh towels and a new shower curtain (for example) can totally change the look of a room, with only a minimal amount of work on your part. 
This remodel is also less likely to look dated 10 years, because we avoided using overly trendy colors in the big permanent pieces of the room.

One of my favorite ways to create a versatile space is with my go-to paint color.


Benjamin Moore's "Ivory White" (number 925) works EVERYWHERE. I've used it on kitchen cabinets, walls, garage doors and even on furniture.  It's the perfect warm white, and goes with everything.  So naturally, this was the color I painted the walls.
Paint stores don't always have samples of this color out, but they can mix it for you, just provide them with the brand name and the color ID number.

Then, with a neutral base of whites (walls, vanity, tile and tub) I was free to make bold color choices with my accessories. 

Adding Finishing Touches

Now came my favorite part!

Gone went the ugly plastic toilet brush and dirty waste basket, and in came new brushed nickel models to match the rest of the metal in the room. I chose this: 


Then it was time to add some color! Since I held back on adding any color to the more "permanent" aspects of the room, it was time to let loose and bring in some bold hues!


I already had the monogramed green towels (a generously homemade gift from a friend).  So I used those as a springboard for creating a pallet. 
To "help" kids remember to hang up their towels, we used hooks in the place of traditional towel racks.


Because it had the green I was looking for, and a variety of other colors too, I went with this shower curtain.  It was a little bit of a gamble, buying it online (site unseen).  But, overall I am happy with how it looks.  This one was my second choice! I still love it too :)


Then I added a pop of color to the floor with this inexpensive orange rug.

I already had the turquoise photo frames (from Target) and I took another gamble on the luxurious yellow towels by buying them online. Online shopping is a mother's best friend!  
I was a little disappointed that they weren't as vibrant as I thought they'd be. But still, it was better than dragging three small children through countless stores!


Overall, we are quite happy with the end result, and hope to enjoy it for many years to come. Stay tuned for future updates and changes to the decor. Happy house fixing!


Thanks for stopping by!


Linking up to these fun parties:

http://livelaughrowe.com/bakers-gonna-bake/
http://www.artsyfartsymama.com/2015/07/artsy-fartsy-link-party-5.html
http://staceyembracingchange.com/2015/07/30/creative-inspirations-linky-party-148/
http://bloomdesignsonline.com/2015/07/lovely-little-link-party-37.html
http://www.posedperfection.com/2015/07/creative-ways-link-party-64-and-features_29.html
http://www.elizabethandcovintage.com/2015/07/be-inspired-features-and-link-party-171.html
http://www.shabbynest.blogspot.com/2015/07/frugal-friday_30.html
http://www.simplysweethome.com/2015/07/friday-favorites-week-279-with-decor-makeovers/
http://chiconashoestringdecorating.blogspot.ca/2015/07/flaunt-it-friday-266.html
http://www.oneprojectcloser.com/creativity-unleashed-link-party/
http://www.justusfourblog.com/2015/07/pinworthy-projects-party-110/
http://thecharmofhome.blogspot.com/2015/07/home-sweet-home-231.html
http://www.dianarambles.com/2015/07/pin-me-linky-party-148.html
http://romantichome.blogspot.com/2015/07/summer-fun-show-and-tell-friday.html
http://lovegrowswild.com/2015/07/the-inspiration-gallery-23/
http://madincrafts.com/mad-skills-party-270/
http://www.thegirlcreative.com/link-party-diy-inspired-7/
http://www.sewcando.com/2015/08/share-your-crafts-its-craftastic-monday.html
http://www.thecasualcraftlete.com/2015/08/02/frugal-crafty-home-blog-hop-138-2/
http://www.flourmewithlove.com/2015/08/mix-it-up-monday.html

Monday, July 6, 2015

Retro Kitchen Redo

When we moved into our last house, the kitchen was (in a word) gross!  But, we made some quick changes (click here to see) and it cleaned up beautifully.

Still, the kitchen felt cramped and oddly arranged.  Overall it was not very user friendly or functional.  So after living with it for about a year, we decided it was time for a complete overhaul.


Before we bought this house, the kitchen had seen some hard days, and apparently a lot of college parties.  But, I love a good project!

Before Photos:

Original "cold storage"; Before


Gas range, before


Refrigerator, before


Now, I am aware that most people probably wouldn't walk into this space and think "Oh my GOODNESS, it's my dream house!" 
But, I did!  I knew that hidden under all of this grime, was a charming beach bungalow (originally built in 1928).  And, I couldn't wait to bring it back to it's former glory!


Kitchen corner, before


Kitchen sink, before


When it was time to remodel and rearrange I set up a temporary "make-shift" kitchen in the laundry room, and we went to work.

The first step was the really fun part. We broke out the sledgehammer, sawzall and a chisel.  Because it was time for:

Demolition!


Take out your frustrations, give a cabinet a good whack with a sledgehammer!
We even re-purposed some of these old cabinets into a playhouse for our children.  For details on that project, see this post.


A note about old houses and with lath and plaster walls (as seen in these photos).  Unlike today's modern sheet rock, traditional plaster crumbles!  Once you start chipping away at it, the whole thing just starts to crumble away.  So, unless you have to remove it because of water damage, it's best to chip with care and caution.   Or, better yet, just leave it alone whenever you can!


We went over the old linoleum floor with simple peel and stick vinyl tiles. I found the best price for these colors on ebay. They are super easy to install, and easy to replace if an individual one gets too worn.


*Note: We installed the floor about a year before the actual remodel. But, I had purchased extra tiles. So, it was easy to fill in any gaps later, after we removed the original cabinets.

We purchased an old classic range from Craigslist, that was contemporary to the time the home had originally been constructed.  I spent an entire day scrubbing the grossness out of the range (see photo below).


I have no idea what that gelatinous gunk was, but with the help of oven cleaner and a scrub brush, I was able to get it out.  

Here are the products that I had the best success with while tackling the grossness:


And, for brightening dingy chrome surfaces, it works well to scrub them with dry steelwool. 


To really get in all the nooks and under the edges of this stove, I literally used dental tools to scrap out all of the gunk! They were great for the detail work.

I have a friend who's a hygienist, and she gave them to me.  But, it looks like you can buy anything on Amazon these days!  I've been surprised how any times it's been handy to have these little gadgets:


Finally it was time to order new cabinets (prefab white vinyl).  We took careful measurements and a salesperson there helped us with the best possible configuration. They delivered them, and we installed them ourselves.

Then... countertops. Oh, how I wanted the clean smooth finish of granite counters!  But, it simply wasn't in the budget.  

Enter: Budget friendly 12" granite tiles!


They are primarily designed for use on floors or walls, but these tiles also work well on a countertop! We simply took the edge pieces to a local stone and marble shop to have put a "bullnose" (rounded edge) put on them.  Then we on the counter installed them like we would have with any other tile.


I had a lovely granite counter, for a fraction of the cost of a slab!  A small strip of white corner trim under the tiles completed the look.

We moved some plumbing and relocated the sink, so that it looked out over my garden (instead of the parking lot next door), added a small dishwasher, and reused the cabinet hardware I'd found on sale at Restoration Hardware.  

Soon, we had an entirely different kitchen!


After


Range, skink, counters and floors: After


New corner with passthrough, after


After


We stayed with a style that would reflect the age and original charm of the home.  But, also we did so while simultaneously adding in modern conveniences.  Little things like a classic beveled edge subway tile backsplash, a black and white color pallet and red accents brought the space to life.  

It was such a relief to have a shiny, new, and functional kitchen!


For more about this little beach bungalow, and the many changes we made there, please see the following posts:


Thanks for stopping by!


Linking up to these fun parties!

http://www.flourmewithlove.com/2015/07/mix-it-up-monday.html
http://www.pintsizedbaker.com/2015/07/two-cup-tuesday-no131.html
http://www.gingersnapcrafts.com/2015/07/wow-me-wednesday-213.html
http://www.savvysouthernstyle.net/2015/07/wow-us-wednesdays-229.html
http://www.thelifeofjenniferdawn.com/2015/07/a-little-bird-told-me-weekly-link-party.html
http://thenymelrosefamily.com/2015/07/whimsy-wednesdays-175.html/2
http://thehappyhousie.com/work-it-wednesday-with-features-12/
http://thewinthropchronicles.com/2015/07/share-it-link-party-174/
http://thediydreamer.com/from-dream-to-reality/unique-fun-summer-projects-fdtr-175/
http://livelaughrowe.com/delicious-burger-ideas/
http://www.artsyfartsymama.com
http://staceyembracingchange.com/2015/07/09/creative-inspirations-linky-party-146/
http://bloomdesignsonline.com/2015/07/lovely-little-link-party-33.html
http://www.elizabethandcovintage.com
http://www.posedperfection.com/2015/07/creative-ways-link-party-61-and-features.html
http://www.shabbynest.blogspot.com/2015/07/frugal-friday_9.html
http://www.simplysweethome.com/2015/07/friday-favorites-week-276-with-ice-cream-recipes/
http://www.kitchenfunwithmy3sons.com/2015/07/kitchen-fun-and-crafty-friday-link_9.html
http://thecharmofhome.blogspot.com/2015/07/home-sweet-home-228.html
http://www.frenchcountrycottage.net/2015/07/feathered-nest-friday_9.html
http://romantichome.blogspot.com/2015/07/solar-powered-light-up-mason-jar-lids.html
https://easypeasypleasy.com/2018/06/07/funtastic-friday-link-party-182/#more-4285