google-site-verification: googlef2ba99a3ab5aecea.html
Showing posts with label Curb appeal. Show all posts

Monday, September 12, 2016

Just Add Color

Latley it seems like there is used patio furniture for sale everywhere!
Summer isn't officially over until the 22nd, so there is still have time to enjoy the outdoors. Luckily, even if it's a bit weathered, used patio furniture is easy to update!

spray painted furniture

First, I gathered up several pieces of worn wicker furniture.


I chose peices that were all made of the same material (wooden wicker). But you could also update multiple pieces of furniture made from different materials as well. As long as you paint everything with corresponding colors, you can mix and match metal, wood, and even plastic furniture. The great thing about the paint that we'll use is that it sticks to just about everything!

If you do go with wicker, check to be sure that it isn't unraveling or broken. Usually the first place you'll notice damage is on the legs. If it's starting to unravel, skip it. But, don't worry about chipped/ faded paint. We will fix that part!


Next, I used 100 grit sandpaper to lightly and quickly remove flaking paint, dirt and spider webs from each piece. Just a quick once-over was enough to remove the worst of it. You don't need to completely sand everything off, just aim for the loose bits.


Now the fun part!

Work outdoors, and cover an area about twice the size of your furniture with a protective surface (to avoid painting your patio too). I like to use old cardboard for this purpose. If you have an "Amazon habit" (like I do) then you probably have no shortage of boxes laying around! But you can also use drop cloths or even old sheets (tip: check your local thrift stores for great deals on sheets!).


Next gather your paint. Here is what I used for this project:

For the largest chair, I used three cans of Rustoleum "Oasis Blue" spray paint. I like the "paint plus primer" (called "2X") because it is durable and easy to use. Wicker tends to soak up a lot of paint, so have multiple cans ready.
If your chair is solid wood or plastic, then you can likely get by with only two cans. 


Next, for the child size rocking chair, I used one whole can of the same brand of paint. This time I used the "Magenta" color. One can was just enough to cover the chair because it was already red.


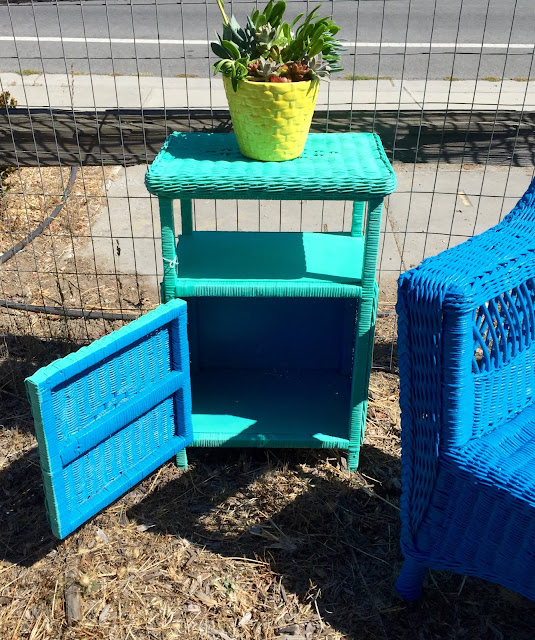
Lastly, I used a different brand of paint for the side table, because I liked the way that the color looked with the other two.
This time I used Krylon Paint and Primer in "Sea Glass".  It took about 3 cans to completely cover piece (inside and out). The coverage wasn't quite as good as the Rustoleum (I had to do one more layer), but the hue looked great with the other two colors I had chosen.


You can use a glossy finish if you like, but I prefer a satin finish. Matte (satin) finishes have a more sophisticated look and tend to hold up better over time.  


I started painting each piece upside down first. To avoid drips, use a quick sweeping motion, holding the can about 9" away from the furniture.  
Starting with the bottom will give you a chance to "feel it out" and get an idea of how to best apply the paint. And, being that the bottom won't really show, painting the underside first tends to be more forgiving of mistakes and/ or drips. Once you feel confident in your technique, flip the chair over and paint the top.  

spray painted furniture

I like to really saturate my wicker furniture with paint, so I added 3 (and in some places 4) coats of paint. Take care to notice if you are getting small areas like edges, corners and legs. It can be helpful to paint each coat from a different angel, to assure good coverage.


spray painted furniture


Once covered in paint, allow your furniture to dry completely.  

spray painted furniture
Spray painted furniture 

For a unique twist, I painted the inside of the table blue, and the outside green. This makes for a fun surprise when the little door is opened.
Add a colorful pot of (easy to grow) succulents to the mix and you will have a fresh set of furniture that's perfect for cheering up any space!  

spray painted furniture

Lastly, at the end of this project my right hand was tinted blue from the overspray. Luckily I have figured out the best way to get any paint off of your hands is to use this product:


It can also help scrub it onto your hands with one of these:


It works like a charm every time, and smells so heavenly!


Before and After

Sometimes I like to use painted patio furniture inside the house for an unexpected pop of color. It's also lovely on a porch, patio or lawn.

Sit back, relax and enjoy!

Before

spray painted furniture
After

That's all for today! Thanks for stopping by, and happy painting!

spray painted furniture
Add caption


Linking up to these fun craft parties:


Sunday, February 7, 2016

Late Winter Flowers


The trees are still bare, and there are crisp dry leaves rustling in the corners.


But, the signs of very early spring are starting to show. The winter flowers are blooming!


The prehistoric looking blooms of a Witch Hazel plant are some of the first flowers to emerge after the frosts have ended. These spidery flowers are a mysterious delight.


Next, small Crocus flowers appear amongst the frozen twigs and remnants of Fall's last show.


I wasn't sure if these small sweet (tried and true) winter flowers would even grow in California. But, last year I ordered a few bags of bulbs anyway. Much to my delight the grew!


They are subtle and delicate, but glimpses of color bring the promise of great things to come.


Another welcome peak of color comes from Primroses. They peak out from empty flower pots, offering vibrant glimpses of color.


I love walking out into my garden to find these first signs that winter is nearing an end. 


Primroses are reliable winter flowers. They die down in the scorching heat of summer, but return reliably late every winter.


The primroses are echoed in vibrancy by the delightful blooms of my reliable Christmas Cactus.


This winter beauty is hard as nails and brings joy every year, even in the dreariest of months.


Camelias are another "sure fire" late winter flower. Mine thrive on a partially shaded hillside.


The low light of late winter ignites winter blooming flowers, making them simply glow. Nature seems to just know how to highlight these beauties, even in their subtly.


Even evergreens, ferns and (the surviving) succulents glow in the cool low light.


Purple Happy Wanderer Evergreen twining vine thrives in a corner of my patio.


This winter flower can live in sun or shade. It has clusters of purple flowers in winter.


Like many winter flowers, this vine is relatively small in stature. It only grows to 10' tall.


Even though it is not yet Valentines day, promises of warmer weather are starting to peek through.


Velvety Pansies and Violas bring cheer to empty corners.


The winter garden is filled with the enchanting scent or Winter Daphne.


This small delicate winter flower unleashes an intoxicatingly sweet aroma, a welcome sign of the spring days ahead.


Thanks for stopping by, and happy gardening!


Linking up to these fun blogs:

http://thefoleyfam.com/2016/02/sunday-funday-link-up-144-features.html
http://www.thecasualcraftlete.com/2016/02/07/the-creative-gallery-166/
http://www.sewcando.com/2016/02/craftastic-monday-link-party.html
http://thediydreamer.com/from-dream-to-reality/show-off-your-creations-204/

Wednesday, August 13, 2014

Easy and Inexpensive Curb Appeal


When we moved into our new house about 5 months ago, the front was anything but charming. Everything was painted the same drab shade of green, and whatever was left alive vegetation wise was pretty dated. So, with only a small budget we went to work livening things up and trying to create a more welcoming facade.

Before and After

As much as I would have loved to professionally landscape and repaint, that wasn't in our budget. So, instead we made pocket friendly DIY changes. The result was an easy and inexpensive curb appeal boost.

Remove Dated Plantings
The first thing we did was take the old juniper plants, boxwoods and hedges. These shrubs had been meticulously shaped and pruned, but they were out of date and out of style.


It took a few days with a chainsaw and a stump remover, but eventually the entire yard was juniper and boxwood free. Since we are currently in a drought, we replaced many of them with succulents and low water plants.


Paint the Trim
Repainting the whole house wasn't in the budget. So, I opted to paint just the trim. I used my favorite shade or white, Benjamin Moore's Ivory White #925 (note: this color has been continued, however paint stores are still able to mix it per request). This is the perfect shade of warm white, and it looks good with everything!


Even if you go over your trim with a fresh coat of paint and don't change the color, it will still freshen up the outside of your house. Plus, a little goes a long way. I painted the trim and the garage door, and it only used about 2 gallons of paint.


Plant a Garden
In a flower bed close to the house I added colorful flowers and plantings, sticking to a vibrant palette of vivid and saturated colors.


We have a family of deer who love to frequent our yard. I enjoy them very much, but don't enjoy providing them with an all-you-can-eat salad bar. So we enclosed part of the front in a low profile wire fence. This way we could grow some of their favorite snacks safely.


A large portion of the front is dedicated to our vegetable garden. Because we also have hungry gophers, I decided to plant vegetables in raised beds. To save on money and time, I ordered large galvanized feeding troughs to use as raised beds. They shipped for free and were delivered right to my driveway in a couple of days!


Bare beds Before
New Plantings After


Accentuate Windows
Ideally, decorative shutters should be wide enough that they could (theoretically) cover you windows when closed. Unfortunately our windows are pretty wide, so that would have meant having them custom made. That just wasn't in the budget, so instead we went with the widest pre-fab vinyl shutters I could find. They were easy to screw on, require no maintenance and help "beef up" the windows.

We also added vinyl window boxes. I filled them with colorful flowers in the same vibrant hues as the bed bellow.


Before
After


Change Light Fixtures
The porch light was very dated, and since I was trying to get away from the "Brady Bunch house" aesthetic, it had to go. The amber glass and metal scrolls screamed 1972. This was relatively easy to switch out ourselves. Just be sure that you shut off the power before attempting any electrical work!

Brady Bunch Before
Updated After

We were also able to swap out just the top portion of the amber glass light fixture at the end of the driveway. Now guests are greeted with a much more modern light guiding their way!


This was a relatively small (and inexpensive) change, that had a large impact.


Add Interesting Elements
Visually, the yard needed a little punch. So in addition to new plants, I added items of interest. Hardscaping can get expensive, and it isn't necessary for increasing curb appeal. A few well placed items can have a similar impact visually, for a much smaller price tag.

Funky flower pots and a shell collection welcome guests near the porch. The black and white designs echo the black shutters, and fresh white trim. Planted with white flowers, their colors are further accentuated. 

Spray paint is your friend! This old christmas wreath now mimics the shutters' black color, and hides a faded spot on the house siding. 
An inexpensive wind catcher (found at Costco for only $20) adds interest to an otherwise dull corner.


The biggest ticket item for this project was a new front door


All of these small changes work together for a big impact!

Before


After
1 year later, with established plantings

Thank you for stopping by, and have fun increasing curb appeal!


Linking up to: savvysouthernstyle.net wow-me-wednesday milkandcuddles.com www.sewcreativeblog.com a-little-bird-told-me-link-party whimsy-wednesdays share-it-link-party make-bake-create from-dream-to-reality whatever-goes-wednesday look-what-i-made-link-party the-inspiration-board-creative-party