google-site-verification: googlef2ba99a3ab5aecea.html
Showing posts with label bedroom. Show all posts

Sunday, June 21, 2015

Boy's Lazure Room

You may have seen my previous post about creating my daughter's rainbow room, using a painting method called "lazure".  In our new house I decided to try my hand at lazure again, this time in my boys' new room.


Hayley Brentmar


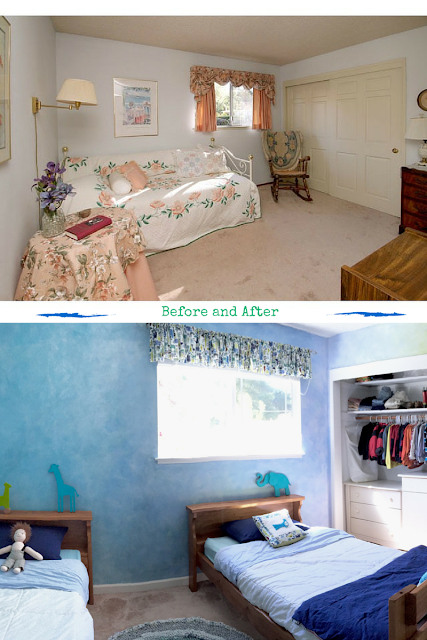
When we bought this house, this room was decorated in a very feminine style, complete with 80’s mauve curtains and accents. It wasn’t what I had in mind for my twin boys’ bedroom. The "before" photo is how it looked (with the seller’s furniture) when we bought the house.


Before

After we moved in, with two toddler’s in the mix, the room didn’t look much better!


During

It saw some hard days and a lot of playtime.  As you can see even the walls were "decorated"! Eventually, I went to work and transformed the room into a Waldorf inspired space for my boys.


hayley brentmar
After


hayley brentmar
After


Wall Color

The method I used for painting the walls is further detailed in my Lazure Tutorial post. But, here is a quick summary:

The first step in creating lazure walls is to start with a bright white base. I like to use off the shelf "ultra pure white" paint. 


I'm also careful to use a matte white. This creates the perfect surface for applying the transparent layers of color on the walls.


You will need:

-Water
-Paint brush (standard good quality wall paint brush)


-Bowl

-A soft cloth rag

-Liquid water color paint (I used Stockmar brand

-In this room, I also used some acrylic paint


Or you could even try using powdered pigment:


-A pigment binder like this (be sure you use matte):


-Large sponge


White acrylic paint


Mix Your Paint

You want a very thin mixture of color. It should still feel watery, and not thick like regular paint. I didn't measure very precisely. But here is the rough recipe:

-2-3 cups of water
-1/4 cup of polymer binder
-1-2 teaspoons of a single water color paint (you will need to mix up a new batch for each color)
-1 tablespoon of white acrylic paint

Mix well, I used the paint brush for mixing.

The next step is to begin applying the mixture to your walls. It is VERY drippy, so apply only a small amount at a time. I started at the top of the wall, and worked my way down to the floor, so that any drips could be easily wiped up with the rag.


Apply with the brush, using a swirling circular motion. Because I had textured walls I really had to "scrub" the color onto the walls. Then follow up with the sponge, using the same arm motions.  


lazure, boy's room, hayley brentmar

As I moved around the room, I changed the colors, fading one into the next.

lazure tutorial, hayley brentmar


Furniture 

Then, it was time to add "big boy beds". I knew I wanted beds that could also become bunk beds once the boys were older. But it was difficult to find convertible beds that were identical in size and shape when separated. Luckily, Amazon came to the rescue!


lazure, boy's room, waldorf walls


Eventually I will add wall hangings, art and photos in the big empty wall spaces. But that will have to wait until the boys are a little older. Right now they'd just pull anything that they could reach down! So stay tuned for an update in the future :)

Then it was time to add details!


I pulled the colors and theme of the room from this fabric. My mom made the curtains years ago for our first nursery. 

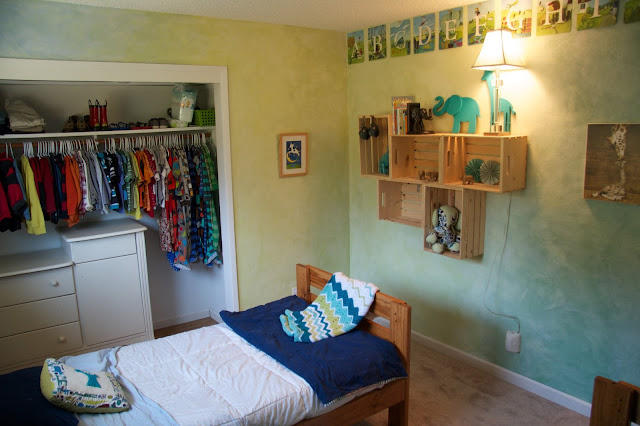
We attached several wooden crates to the wall for storage. 


hayley brentmar


Then I filled the crates with animal themed nicknacks, and other colorful things that matched the walls.

hayley brentmar

hayley brentmar

hayley brentmar


As the boys get older we will be able to add more items. 

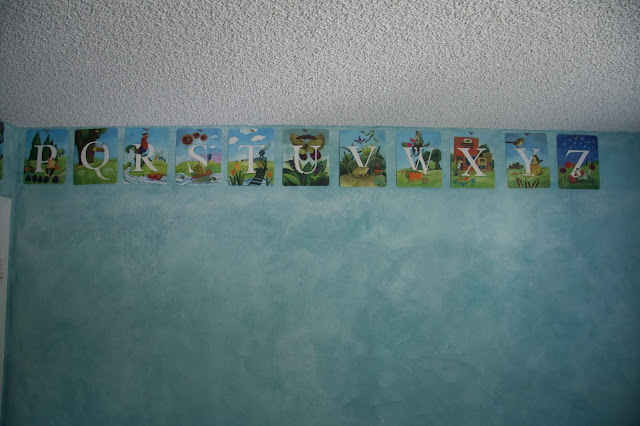
I surrounded the top of the walls with these alphabet wall cards:


They are primarily shades of blue and green, so they match the walls perfectly. The animal theme is also carried through with them. 


hayley brentmar


Again, someday when the boys are older I will add more decor to the wall below them. 


For now the decor has to remain pretty sparse, and very kid-friendly. 


hayley brentmar


I found the wooden animals at The Goodwill, and used acrylic paint to make the turquoise. The Waldorf doll is from Etsy. He does have more clothes... somewhere!


Floor

For the floor I collected old sheets from thrift stores and used them to crochet a rag rug.


To create this rug, I used a combination of this tutorial, and lessons from a friend. It was a time consuming project. But it was nice because it was cost effective, and I was able to chose my own color pallet. 


hayley brentmar


Overall everyone seems happy with the way this room came together. We're looking forward to adding to it more and more in the future!


Before:


After:

 boy's room, lazure, waldorf


Thanks for stopping by!


Linking up to these fun parties:
http://www.skiptomylou.org/2015/06/22/made-by-you-monday-244/
http://madincrafts.com/mad-skills-party-264/
http://www.twelveoeightblog.com/2015/06/inspiration-monday-party-red-white-blue-fabulous.html
http://diyshowoff.com/2015/06/21/that-diy-party-49/
http://www.titicrafty.com/2015/06/bewitchin-projects-block-party-103/
http://www.sewcando.com/2015/06/share-your-projects-at-craftastic.html
http://www.thecasualcraftlete.com/2015/06/21/frugal-crafty-home-blog-hop-133/
http://www.flourmewithlove.com/2015/06/mix-it-up-monday-blog-party.html
http://www.gingersnapcrafts.com/2015/06/wow-me-wednesday-211.html
http://www.mygirlishwhims.com/2015/06/your-whims-wednesday-217-and-features.html
http://www.savvysouthernstyle.net/2015/06/wow-us-wednesdays-227.html
http://thenymelrosefamily.com/2015/06/whimsy-wednesdays-173.html/2
http://thehappyhousie.com/work-it-wednesday-4/
http://thewinthropchronicles.com/2015/06/share-it-link-party-172/
http://thediydreamer.com/from-dream-to-reality/show-off-your-creations-173/


Monday, November 3, 2014

A Black Ceiling? Absolutely!


What's one way to jazz up a boring room? Look up!  Create an elegant black ceiling easily.


Black ceiling

We were blessed to have a large bedroom with tall ceilings in our last house. But, something about it just didn't feel right.


Even after painting the walls a soft yellow, the room still felt sterile and uninviting.


There were interesting architectural details built into the ceiling, but the monochromatic color scheme made them disappear. (Please excuse the laundry basket and baby gate in the photo above. Real life sneaks into my photos sometimes!)


I needed a change, and it needed to be bold! Typically interior designers will advise against dark ceilings, claiming that it makes the room feel smaller. But, in this case I decided to break the rules.

Since we had some black furniture in the room I painted the ceiling a dramatic flat black. The result was a fantastic black bedroom ceiling!

Black Ceiling

Suddenly the room felt inviting. The lovely crown molding and raised ceilings came into focus. The space transformed from boring to interesting.

Great things can happen when you use your artistic license the break the rules of design!

Black bedroom Ceiling


Thank you for stopping by, and remember to be bold!  Try adding romance and dram to your space with a black ceiling!


Sunday, July 20, 2014

Lazure Tutorial; Creating The Rainbow Room

The Waldorf lazure painting method. A lazure tutorial:

lazure DIY

On a recent visit to our local Waldorf school I was inspired by the beautifully painted walls. They were painted using a method called "Lazure", which has long been favored by Waldorf schools, and the traditions inspired by Rudolf Steiner.

Santa Cruz Waldorf School

Lazure a specific method of painting that consists applying layers of thin paint to a white wall. The "paint" itself is made up of water, binder, and pigment. The result has a dreamy, etherial quality.


SC Waldorf School, Kindergarden Classroom


I did some on-line research, and while I didn't find very many lazure painting tutorials, I was able to find a lot of inspiration, and a few "how to's" and tutorials.  But, overall the directions on how to produce this lovely ethereal effect were vague. So, with my background in art and painting, I was able to piece together a method that worked.

Lazure is a very old and specific art. While my method probably doesn't exactly follow tradition, I did get the result I'd hoped for (pictured bellow).


Lazure How To:


The following is a step by step Lazure painting tutorial. I did a DIY lazure, and it might not be the way a purist would go about it, but I got the desired effect.


Prep your Walls

In order to get the best effect, you will want to start with white walls. So, I began by painting the walls with a regular latex wall paint. I used off the shelf "ultra bright white". It's important to use a matte or flat finish. This should be available and easy to find at any hardware store, as it is the base for mixing all other paint colors.


Assemble your supplies:

You will need:

-Water

-Paint brush. A standard good quality wall paint brush like this one:


-Bowl or other container for mixing

-A soft cloth rag. I like to use cotton.


-Liquid watercolor paint. I used Stockmar Watercolor.  Please see the link below for more information:


**Alternatively, if you are on a budget, instead of the watercolor paint, you could probably use one of the following:

Artist grade acrylic paint like this:


Or, use a powdered pigment, like this:


-A pigment binding medium

I used this, because it's what I had in my stash at the time. But any type of matte polymer medium will work. This should be available at any art supply store, or on Amazon. I like the brand below:


*Update* Since I originally wrote this post, I have heard that people have had success with this binder:


Apparently it dries slower than what I used, allowing you more time to blend colors together. I can not personally attest to using it though.


-A large sponge. It can be dry or slightly damp. I used this one:


-Cheap white acrylic paint (student grade is fine). My go-to is this:


Get ready to mix!


Mix Your Wall Paint

You want a very thin mixture of color. It should still feel watery, and not thick like regular paint. I didn't measure very precisely. But here is the rough recipe:

-2-3 cups of water
-1/4 cup of polymer binder
-1-2 teaspoons of a single water color paint (you will need to mix up a new batch for each color)
-1 tablespoon of white acrylic paint

Mix well, I used the paint brush for mixing.

Lazure baby Lazure!

The next step is to begin applying the mixture to your walls. It is VERY drippy, so apply only a small amount at a time. I started at the top of the wall, and worked my way down to the floor. This way any drips could be easily wiped up with the rag.


Apply the mixture with the brush, using a swirling circular motion. Because I had textured walls, I really had to "scrub" the color in.
Then, follow up with the sponge, using the same circular/ sweeping arm motions. Imagine you are drawing "figure 8's" on the wall.

For a color that is consistent through the whole room: cover the entire wall with one color, and then layer another coordinating color on top of it. For example: blue and then yellow, would create a dreamy green.

I knew that I wanted the lazure colors to change as they moved around the room. So I applied one color at a time, fading it lighter towards either side.

Getting ready to fade into the next color

This way I could blend the next color in, so that it would appear like the two colors faded into one another.  Again, with the next color, I started with a lighter layer (over the edge of the previous color), moved onto a heavier application of solid color. Then, I again faded it with a lighter application as I moved towards the edge. This way the colors "blended" together as they met.

Lazure DIY
Blending Two Colors

Correcting Mistakes

My first attempt yielded some less than favorable results. I soon discovered a few times I had added too much watercolor pigment, and that some colors came out more saturated than others. Lazure is supposed to be light and dreamy, not bright and obnoxious!

Whoops! Too bright

Instead of starting over from scratch, I was able to fix the problem. I mixed up some water, and a small amount of the white latex wall paint (that I'd originally used as a base coat for the walls). This made a transparent white wash (test in a small area first, until you reach the desired consistency). I was able to use this to "dull down" and lighten the areas that were too vibrant. 


Using the large sponge, I dipped into the watery white paint and scrubbed the mixture directly onto the wall. I varied my arm strokes, sometimes swirling and sometimes using "S" curves. It is these subtle variations in tone that result in the depth of the final result. 


The white paint mixture becomes more transparent as it dries. 


End results


Overall I was pleased with the end result. Working in "rainbow order" I was able to include almost all of the colors. I love the way the color of this room changes subtly as the eye glides around the space. 


Some more close ups, and detailed photos of the space:


*The wool rug pictured above is made by Dash and Albert, and it's called "Gypsy Rose."


*Update*

In our new house I used this method again to paint the walls of my boys' room. For more ideas, inspiration, and another tutorial please see my newest Lazure tutorial:

Here are some preview photos:


If you try this project, I'd love to see the results! Please feel free to add a link to your photos in the comments section.