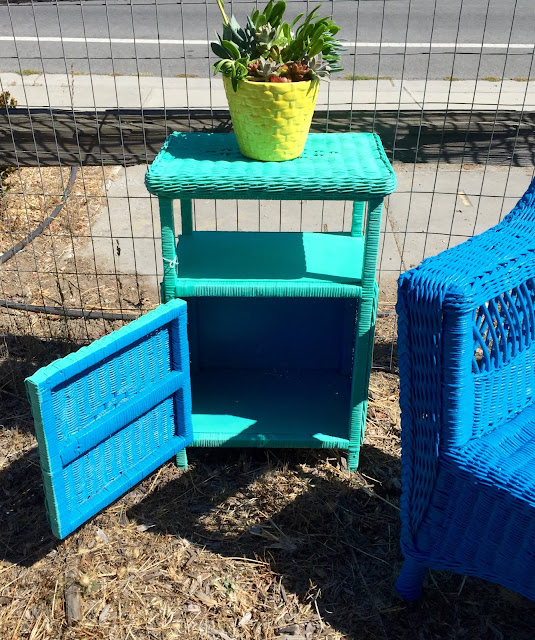
Summer isn't officially over until the 22nd, so there is still have time to enjoy the outdoors. Luckily, even if it's a bit weathered, used patio furniture is easy to update!
First, I gathered up several pieces of worn wicker furniture.
I chose peices that were all made of the same material (wooden wicker). But you could also update multiple pieces of furniture made from different materials as well. As long as you paint everything with corresponding colors, you can mix and match metal, wood, and even plastic furniture. The great thing about the paint that we'll use is that it sticks to just about everything!
If you do go with wicker, check to be sure that it isn't unraveling or broken. Usually the first place you'll notice damage is on the legs. If it's starting to unravel, skip it. But, don't worry about chipped/ faded paint. We will fix that part!
Next, I used 100 grit sandpaper to lightly and quickly remove flaking paint, dirt and spider webs from each piece. Just a quick once-over was enough to remove the worst of it. You don't need to completely sand everything off, just aim for the loose bits.
Now the fun part!
Work outdoors, and cover an area about twice the size of your furniture with a protective surface (to avoid painting your patio too). I like to use old cardboard for this purpose. If you have an "Amazon habit" (like I do) then you probably have no shortage of boxes laying around! But you can also use drop cloths or even old sheets (tip: check your local thrift stores for great deals on sheets!).
Next gather your paint. Here is what I used for this project:
For the largest chair, I used three cans of Rustoleum "Oasis Blue" spray paint. I like the "paint plus primer" (called "2X") because it is durable and easy to use. Wicker tends to soak up a lot of paint, so have multiple cans ready.
If your chair is solid wood or plastic, then you can likely get by with only two cans.
If your chair is solid wood or plastic, then you can likely get by with only two cans.
Next, for the child size rocking chair, I used one whole can of the same brand of paint. This time I used the "Magenta" color. One can was just enough to cover the chair because it was already red.
Lastly, I used a different brand of paint for the side table, because I liked the way that the color looked with the other two.
This time I used Krylon Paint and Primer in "Sea Glass". It took about 3 cans to completely cover piece (inside and out). The coverage wasn't quite as good as the Rustoleum (I had to do one more layer), but the hue looked great with the other two colors I had chosen.
This time I used Krylon Paint and Primer in "Sea Glass". It took about 3 cans to completely cover piece (inside and out). The coverage wasn't quite as good as the Rustoleum (I had to do one more layer), but the hue looked great with the other two colors I had chosen.
You can use a glossy finish if you like, but I prefer a satin finish. Matte (satin) finishes have a more sophisticated look and tend to hold up better over time.
I started painting each piece upside down first. To avoid drips, use a quick sweeping motion, holding the can about 9" away from the furniture.
Starting with the bottom will give you a chance to "feel it out" and get an idea of how to best apply the paint. And, being that the bottom won't really show, painting the underside first tends to be more forgiving of mistakes and/ or drips. Once you feel confident in your technique, flip the chair over and paint the top.
I like to really saturate my wicker furniture with paint, so I added 3 (and in some places 4) coats of paint. Take care to notice if you are getting small areas like edges, corners and legs. It can be helpful to paint each coat from a different angel, to assure good coverage.
Once covered in paint, allow your furniture to dry completely.
 |
| Spray painted furniture |
For a unique twist, I painted the inside of the table blue, and the outside green. This makes for a fun surprise when the little door is opened.
Add a colorful pot of (easy to grow) succulents to the mix and you will have a fresh set of furniture that's perfect for cheering up any space!
Add a colorful pot of (easy to grow) succulents to the mix and you will have a fresh set of furniture that's perfect for cheering up any space!
Lastly, at the end of this project my right hand was tinted blue from the overspray. Luckily I have figured out the best way to get any paint off of your hands is to use this product:
It can also help scrub it onto your hands with one of these:
It works like a charm every time, and smells so heavenly!
Sometimes I like to use painted patio furniture inside the house for an unexpected pop of color. It's also lovely on a porch, patio or lawn.
Sit back, relax and enjoy!
 |
| Before |
 |
| After |
That's all for today! Thanks for stopping by, and happy painting!
 |
| Add caption |
Linking up to these fun craft parties:


