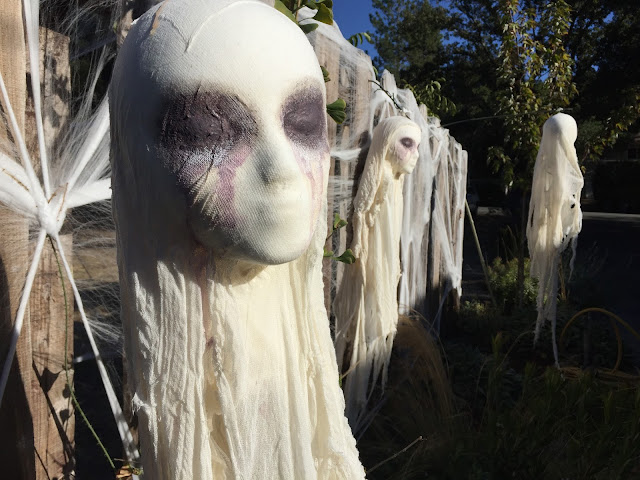
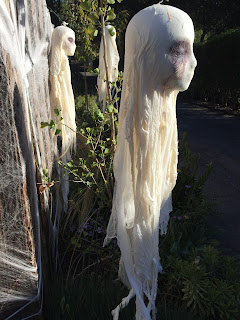
At least the kids don't seem to be too afraid of them.
Here's the basics of how I made these easy creepy haunts:
I came across this tutorial, from Martha Stewart... oh how I love Martha. She calls these creations "Cheesecloth Spirits", which sounded pretty tame to me. Here's what her version looks like:
I decided to give it a try! First I found the wig heads, for much cheaper on Amazon than the sources listed in the original tutorial. Because it's always good to use odd number grouping when decorating, I ordered 3.
I followed the directions on the tutorial, using a mixture of watered down Stiffy, and craft glue. But, it would work just as well with some outdoor mod podge.
To apply it I used a cheap foam brush. You could probably just use a sponge too.
This is a messy job, and you'll need LOTS of cheesecloth. I'd plan on at least several yards per "spirit". Start by placing a piece of cheesecloth over your Styrofoam head, coat with outdoor mod podge.
Continue to layer on more sheets of cloth, ripping the ends to give it an erie look.
But, once these were dry, the looked too plain to me. There wasn't much definition in the face, so I decided to bring more attention to the eyes.
Using watered down acrylic paint, I added deep purple to the eye area. Because it was so watered down, it dripped down the face and into the folds of the fabric, causing a super erie "bloody tears" effect. You could use blood red, but I prefer subtlety suggestive halloween decorations. Overdoing it on the "blood and guts" always seems like kind of an easy cop-out to me. Subtle is creepier.
But, I have little kids in the house, and they looked a bit too creepy. So I decided to try to tone down the freaky factor a little bit.
For slight sparkle and texture I applied some mica flake medium that I had on hand.
I also covered up some of the dark purple with plain white acrylic. They were a little less disturbing after this.
Time for them to find a home!
I glued/ screwed white cup hook into the top of each head, and suspended them from small bamboo sticks.
Be sure you really rip up the cheesecloth at the bottom, so that there is plenty of extra fabric to flutter in the wind.
Happy Halloween!
Also, if you like DIY decorations as much as I do, you may enjoy this post:
Thanks for stopping by!
Linking up to these fun crafting blog parties:
http://www.flourmewithlove.com/2015/10/mix-it-up-monday-blog-party-without_25.html
http://www.funkypolkadotgiraffe.net/2015/10/too-cute-tuesday-linky-par-tay-256.html
http://myuncommonsliceofsuburbia.com/inspire-me-monday-83/
http://www.tipjunkie.com/post/tip-me-tuesday-happy-crafters-share-10-27/
http://cornerstoneconfessions.com/2015/10/titus-2-tuesday-179.html
http://thecraftyblogstalker.com/create-link-inspire-linky-party-100/
http://www.carolynshomework.com/2015/10/the-inspiration-board-creative-party_27.html
http://ladybug-blessings.com/?p=6329
http://www.gingersnapcrafts.com/2015/10/wow-me-wednesday-229.html#
http://www.mygirlishwhims.com/2015/10/your-whims-wednesday-234-and-features.html
http://www.savvysouthernstyle.net/2015/10/wow-us-wednesdays-245.html
http://thenymelrosefamily.com/2015/10/whimsy-wednesdays-191.html/2#
http://thehappyhousie.porch.com/delicious-fall-desserts/
http://thewinthropchronicles.com/2015/10/share-it-link-party-190/
http://justagirlandherblog.com/hit-me-with-your-best-shot-91/
http://thediydreamer.com/from-dream-to-reality/come-on-over-and-show-off-your-stuff-fdtr-190/
http://www.posedperfection.com
http://bloomdesignsonline.com/2015/10/lovely-little-link-party-49.html
http://staceyembracingchange.com/2015/10/29/creative-inspirations-linky-party-161/
http://www.artsyfartsymama.com
http://www.coloursaturatedlife.com/6-fabulous-fall-decor-ideas-brag-worthy-link-party-3/
http://livelaughrowe.com/around-the-house/
style="display:block"
data-ad-client="ca-pub-1259762351787524"
data-ad-slot="8522386894"
data-ad-format="auto">

