google-site-verification: googlef2ba99a3ab5aecea.html
Showing posts with label Children. Show all posts

Wednesday, February 22, 2017

DIY Hand Kites (Ribbon Ring)

It's that time of year again in my household: Birthday season!

Luckily all 3 of my kids' birthdays are two weeks apart, so we are able to have one big celebration for everyone. This year I decided to go with a colorful "rainbow" theme.

For the party favor bags, I wanted to be sure to include a handmade element for each child to enjoy. I love providing children with lovingly handmade things to pay with.


But, there were a few requirements. For one, it needed to be something that I could easily produce and in a short time. Also, it had to go with our colorful rainbow theme and be inexpensive.

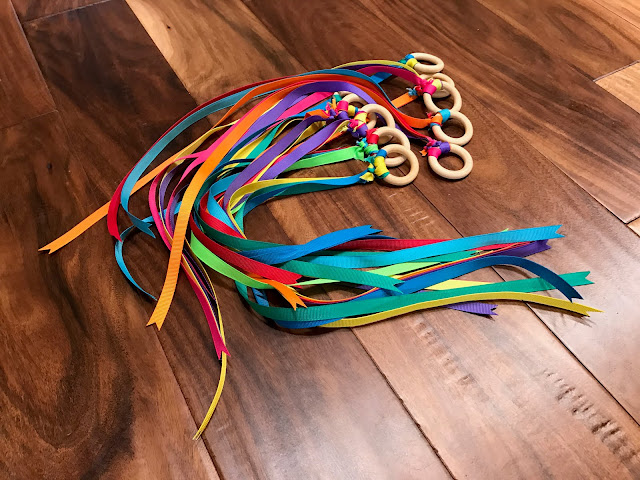
So, created small Waldorf inspired ribbon rings. These "Hand Kites" were the perfect addition to our favor bags!
They are great fun for throwing and watching them soar through the air, or for simply dancing around with dancing around with. Plus I love that they are also an open ended toy.


Here are the supplies I used for this project:

Wooden rings:


Clored ribbon. (I used two packs of this to make about 20 rings)


Sharp Scissors 


From there it was super easy to make these!

First:

I chose 3 coordinating colors to use for each ring. Usually I used analogous colors (or colors that are next to each other of the color wheel). Then, I empty an entire spool of ribbon, and cut the length of it exactly in half.


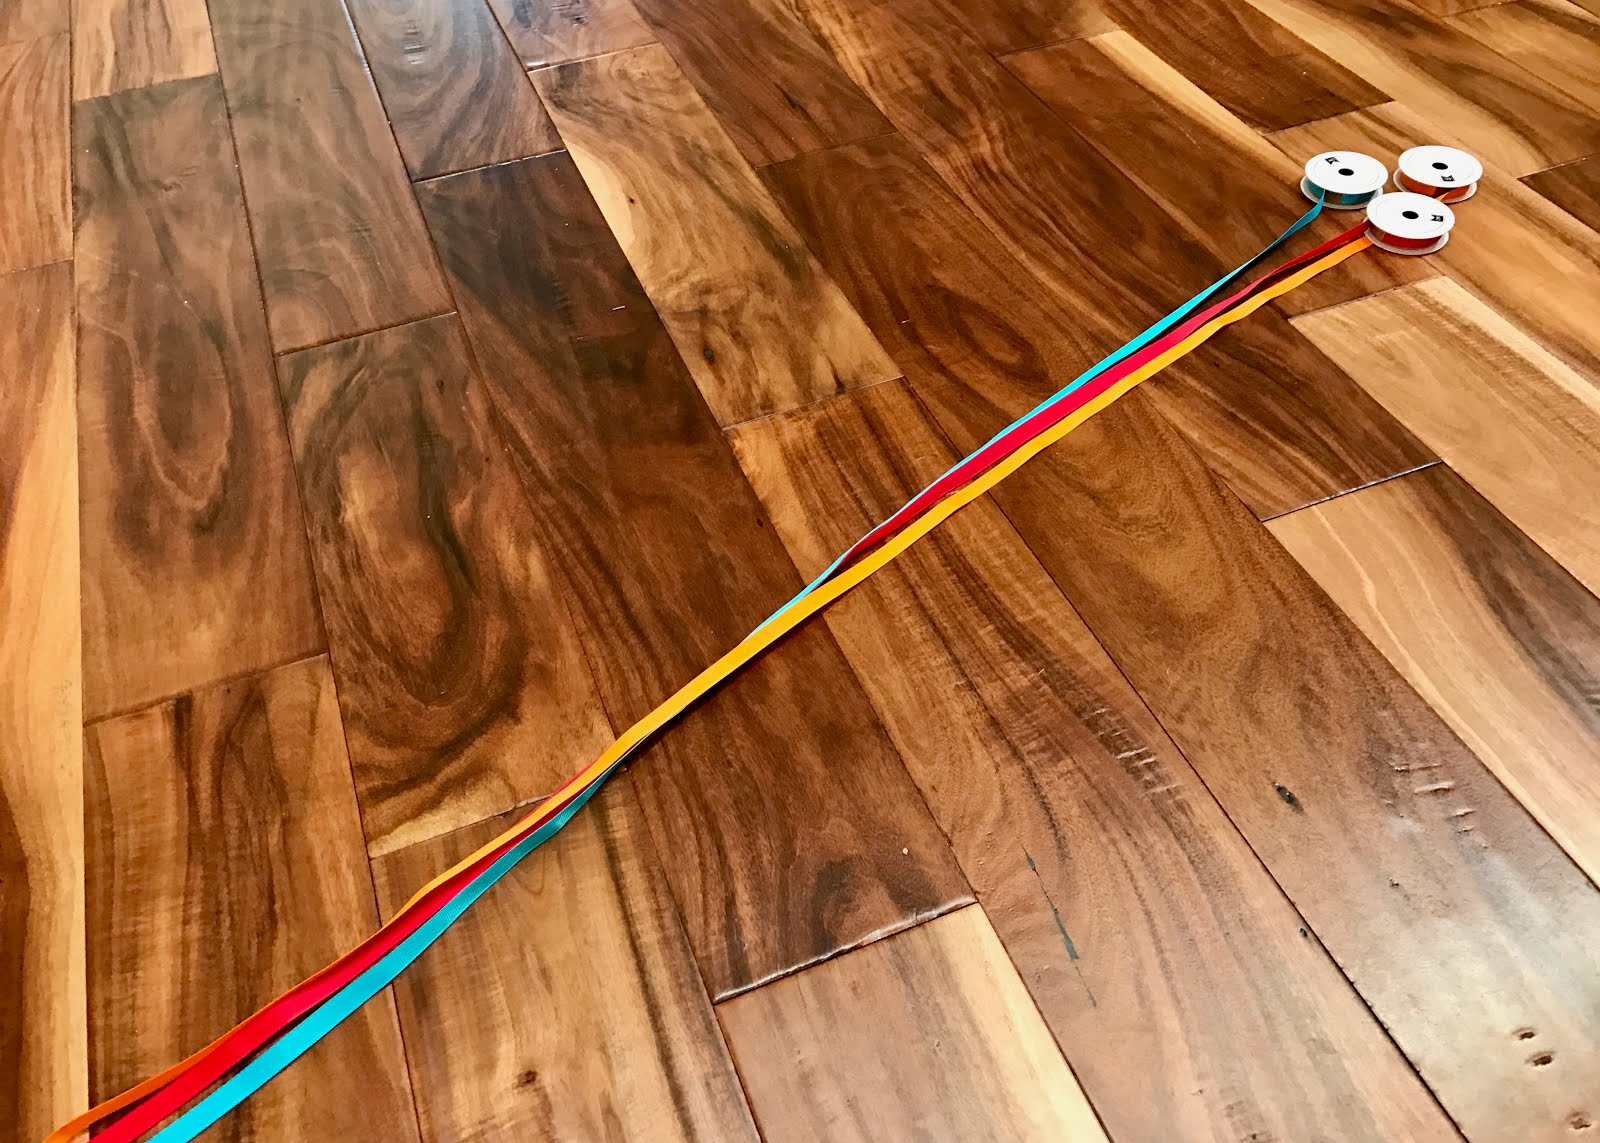
Each (half length) strand of ribbon was the perfect length for one ring. 

Then: 

The next step was super easy too. I looped the ribbon through itself to secure it onto the ring, leaving one side much longer than the other. Then, I pulled it tight. 


To make sure that they held up to rough play, I further tied one end of each ribbon securely onto the wooden ring. Then, I snipped off any access  ribbon (from the short ends) near the knots. 


Lastly:

To dress them up a little, and keep the ribbon from unraveling, By making one diagonal cut, I cut a "v" shape in the end of each ribbon. Sharp sewing scissors make this step much easier.


Simply hold the ribbon between your fingers, pinch it in half and make a diagonal cut across the folded ribbon (pointing towards the wooden ring). Essentially you want to cut out a small triangle.


Lastly, enjoy and share your colorful creations! They are great for tossing through the air, dancing or anything else your imagination can think of.


That's all, and thanks for stopping by!


Linking up to these great parties:

http://www.gingersnapcrafts.com/2017/02/wow-me-wednesday-287.html
http://www.mygirlishwhims.com/2017/02/your-whims-wednesday-295-and-features.html
http://www.savvysouthernstyle.net/2017/02/wow-us-wednesdays-314.html
http://www.colorsandcraft.com/blog/2017/2/share-it-link-party-258
http://thediydreamer.com/from-dream-to-reality/share-crafts-diy-projects-255/
http://www.uptodateinteriors.com/2017/02/the-creative-circle-no-104.html
http://staceyembracingchange.com/2017/02/23/creative-inpirations-linky-party-and-features/


Friday, December 2, 2016

DIY Playsilks

How to make your own playsilks!


Since my kids were very little, playsilks (classic Waldorf toys) have been a big hit. They’ve functioned as everything from superhero capes, to playscapes and tent building supplies. I love that they are open ended, made from natural materials and that they encourage children use their imaginations. One year we even made them as gifts for all of our friends!

Playsilks can be purchased ready made (Sara’s Silks https://www.sarahssilks.com) but they are usually pretty pricey. Luckily, they are super easy to make on your own! There are many methods and techniques out there for dying playsilks (for example with Kool aid, fabric die and so on).
I’ve tried them all. Here is what works the best!


I have found that the following method produces the longest lasting and most vibrant colors.


Here’s what you’ll need:

White vinegar
Get at least a gallon of it if you plan on making several scarves. I usually keep a few gallons on hand, just so that I don’t run out. It’s cheap and easy to get in the grocery store (look near the distilled water).


Good quality food coloring
I like to use gel color, and in particular this brand:


A medium size pot


Water

Optional: rubber gloves to protect hands from dye


White Habotai Scarves
I like to use a variety of sizes. There are many different sizes available. Here are a few examples:


This website is also a good source for plain silk scarves (you will just have to pay shipping):
http://www.dharmatrading.com

Rubber bands (if you want a marbled/ tie-die effect)


First:

Wash your scarves in warm/ hot water. I just toss mine in the washing machine with regular detergent. Or you could wash by hand, but you must wash them. I skipped this step once, and the color didn’t stick nearly as well. You can dry them too, but it’s not necessary.

Next:

Heat up a pot of 1/2 parts white vinegar, 1/2 parts water (I usually use about 1 cup of each). Then add a generous amount of food coloring, in the color of your choice. I usually heat mine to boiling (or nearly boiling).

Make the magic happen:

Gently add one of your scarves to the hot mixture. I like to swirl them around with a whisk to ensure uniform color. I usually turn down the heat and let it sit in there for about 5 minutes, stirring occasionally.


Finishing:

Remove your playsilk from the pot and place in the sink. Rub it under cool water, rinsing until the water runs clear (or nearly clear).

Then, to seal in the color even more I like to run my (wet) scarves through the dryer on a hot setting. They should be dry within just a few minutes.

Lastly:

They will come out wrinkled, and perhaps not as “silky” as you’d hoped for. Luckily a quick once-over with a hot iron easily changes this! Sometimes it helps to use the steam setting on your iron.

Play and enjoy!


Variations:

While solid colored playsilks are a lot of fun and have many uses, you can easily create even more intricate ones with there methods!


For a marbled look, before placing it in the die bath, scrunch up sections of your scarf and secure with rubber bands. I especially like to do this when dying a scarf blue because it produces an effect that resembles clouds and sky.


To get a classic tie-die spiral, first die your scarf one solid light color (I like to use yellow). Then rinse, lay the wet scarf flat and pinch the middle. Holding onto the middle, begin to twist and rotate the fabric until you have a circle/ disk like shape. Secure the disk by wrapping several rubber bands around it. Then place in a darker color dye bath (as described above). I like to use dark blues and or vibrant rich greens. Let it soak for a few minutes, remove from hot water, cut off rubber bands, rinse and dry.


Rainbow (or multicolored) silks seem daunting, but they are actually very doable too.


Starting with red dye (for example), dip just one end of your scarf into the dye bath. let it sit for a while, and then rinse with cool water. Miix up another batch of die bath in the next color you’d like to use, for example orange). Then dip the next section into that color. It’s even okay if the two colors overlap a bit, as this gives it a nice blended look.


Sometimes I like to mix up smaller batches of die for this purpose. I just use mason jars and then lower them into a larger pot of hot water (see pic).


A word of WARNING: Be SURE to turn off the burner on your stove before attempting to dip sections of your scarf into the pot (and leaving other sections out). Chances are that sections of it will drape over the side, and they can catch fire, easily. I speak from experience!


Lastly, the issue paper method can be a neat way for making unique playsilks too. Using this special tissue paper you can get some really neat looks:


Simply lay down some cardboard (or use a surface that you don’t care about getting messy). Then lay down some sheets of this "bleeding" tissue paper. It’s fun to use a variety of colors. Next, lay your scarf on top of the paper and cover the top with more tissue paper. Take care that the colors on top correspond with the colors on the bottom.


Then, using a spray bottle, generously spray the whole thing with white vinegar. Really soak it!


Allow it to sit and dry for at least ten minutes. The rinse under cold water, dry and iron.


Then, create a fun way to store you silks, play and enjoy!


That's all for today, thanks for stopping by!


Linking up to these fun parties:

http://www.gingersnapcrafts.com/2017/02/wow-me-wednesday-287.html
http://www.savvysouthernstyle.net/2017/02/wow-us-wednesdays-314.html
http://www.colorsandcraft.com/blog/2017/2/share-it-link-party-258
http://thediydreamer.com/from-dream-to-reality/share-crafts-diy-projects-255/


Sunday, October 2, 2016

Narwhal Natural; A Great Subscription Service!

Left to their own devices, my kids would probably chose to play on the computer all day long. But, that is not the childhood that I want for them. Screen time overload is not the hope and dream that I have for their days.

narwhal natural

Instead, I want them to love learning and to experience nature and all her glory. I yearn for them to interact with and “get to know” the natural world.

narwhal natural
This is why I am SO EXCITED to be a part of a new subscription service for children! Starting immediately, a dear friend and I will be offering this lovely service to families nationwide. 

I am so pleased to introduce:


Narwhal’s mission is to create unique opportunities for children to unlock learning and creativity inspired by a love of nature. We strive to nurture a child’s creative spirit, while simultaneously connecting them with the natural and scientific world. 

narwhal natural


Our monthly mail order subscription service (The Terra Crate) uses natural items like wood, shells, rocks, etc. combined with quality arts and crafts supplies to guide students in creating hands on projects that are beautiful, educational and often functional. Our projects are open ended and leave plenty of room for imagination. We bringing together art and the natural sciences through the study of nature and hands on experiences.

 Terra Crate, narwhal natural Terra Crate, narwhal natural

We also offer a regular blog with creative project ideas for both children and adults. Please stop by anytime to check out this free and fun resource! 

narwhal natural
Tutorial

You can find the Narwhal Natural blog and tutorials here:

narwhal natural
Tutorial

We look forward to providing your children with hours of creative inspiration!

narwhal natural

Terra Crate, narwhal natural


Terra Crate, narwhal natural

Thanks for stopping by, and happy crafting!
SaveSave

Thursday, August 18, 2016

How to Make Drip Castles

Summer is almost over! We have been enjoying soaking up those last rays of warm sunshine, and spending as much time as we can outdoors! One thing we enjoy doing, both at home and on vacation, is going tho the beach and playing in the sand.

how to make drip castles

Growing up in San Diego, one of my favorite things to do as a child was go to the beach and build drip castles. I still remember the day my mom first showed me the simple magic that is a drip castle!

how to make drip castles

Drip castles rise from the shore like mythical mermaid mansions. But, they are also really easy to create! I've tried making these with (backyard) sand box sand, and it doesn't work as well. I'm not sure if you need the salty sea water, or the fine beach sand, but for some reason I've only been able to make these at the beach.

To start, make a regular sand castle (just a pile if damp sand). This will be your base.


Usually about a foot will be tall enough. But you can make your castle as elaborate and large as you want to!


Next fill a container with ocean water. We've had this little sand play set for years, and love it!


Next, add some sand to the water in your bucket. I usually fill it about 3/4 full of sand. You'll want to keep it VERY watery.


Now comes the fun part! Dip your hand into the water and grab a handful of sand. You want it to be very drippy. Then quickly (before too much of the water drains out) drizzle the sand onto your castle.

how to make drip castles

After a few seconds, the sand in your hand will become dry, and start to clump. That's when you know to go back for a fresh scoop. Eventually, you will notice the sand begin to pile up on top of itself, creating and otherworldly formations.

how to make drip castles
Add caption


Play around with moving your hand slowly to the side, and keeping it in one place. You'll discover that you can create a variety of shapes and towers!

how to make drip castles

It's fun to see how tall you can make them! Sometimes it can also be fun to add a few "guard towers" on the flat part around your castle.

how to make drip castles
Add caption


Sometimes, if we are very careful, we are even able to make small holes, tunnels and bridges!

how to make drip castles

If you stay at the beach long enough, eventually you'll notice that even once your drip castle is dry, it will still retain it's shape!
Encourage mermaids and other sea creatures to visit by embellishing your castle with found objects. Things like kelp and shells work great for this!

how to make drip castles
Add caption

Sit back, soak up the sun, and enjoy your handiwork!

how to make drip castles


That's all, thanks for stopping by!


Linkning up to these fun parties:

http://livelaughrowe.com/vegetable-side-dishes/
http://www.artsyfartsymama.com/2016/08/artsy-fartsy-link-party-3.html
http://staceyembracingchange.com/2016/08/18/creative-inspirations-linky-party-and-features-10/
http://www.posedperfection.com/2016/08/creative-ways-link-party-119-and.html
http://tidymom.net/2016/homemade-after-school-snack-recipes/
http://www.oneprojectcloser.com/creativity-unleashed-link-party/
http://www.mysuburbankitchen.com/2016/08/pinworthy-projects-party-162/
http://dianarambles.com/2016/08/pin-linky-party-203.html
http://www.avisiontoremember.com/2016/08/the-creative-exchange-august-18.html


Saturday, August 6, 2016

Homeschool Room Tour


The long lazy days of summer will be winding down soon.  And, as much as I'd love to just lay back and mindlessly soak in the sunshine, thoughts of the school year ahead are drifting into my mind.

September is just around the corner!


This is the time of year that many homeschooling parents begin to think about how we arrange our space. So, in the spirit of a new academic year, I present a tour of our homeschool room!

I have also added direct internet links to the various items I have around the room, so that you can easily add them to your space if you wish..
Also, because I love "before and afters," I included some photos the original space originally when we bought our house (about two years ago).

Climb the stairs and join us! Welcome!

Stairs, before


On your way up the staircase, you will see a few bulletin boards as well as vintage inspired maps and scientific diagrams. To keep the space warm and welcoming, I use natural materials and subtle colors. 


The "posters" are actually intended to be wrapping paper, but they work great as decor on the walls! I love their classic look and soft colors. I found ours at a museum gift shop, and Amazon carries a lot of them too (here are just a couple of examples):


As soon as you round the corner at the top of the stairs and enter the space, you'll see where we do the bulk of our work. 
We spend the majority of our time at the sturdy vintage table. It was a lucky flea-market find that's held up to 3 kids really well! 

waldorf homeschool room

I am fortunate to have a large space that I can dedicate just to homeschooling. I know that not everyone does. When I first started homeschooling all I had was a desk in our entryway! So if you don't have a whole room, please know that I understand what that's like too (and be sure to check out the folding furniture I will discuss below).
Part of what sold me on the house we're in now was the potential of the upstairs space. This big room now doubles as both a place of learning, and a family room.

waldorf homeschool room

As you can see in the photo above, about half of the room functions as a comfy area to relax. We enjoy sitting on the couch to do our reading.

family room

And, the kids like to watch movies here (a TV is intentionally hidden in the armoire pictured below).

family room

I've tried to make the space welcoming, yet versatile too. I particularly like the chairs and table in this little conversation area because they fold, and are easily collapsed and moved out of the way. This is very helpful when (for example) you get a really good game of "ring around the rosie" going!


Having folding furniture is great if you are short on space too! I get everything from Amazon these days! Her are the exact chairs and tables I have:


I also really like this wall mounted murphy desk, because it can also be folded up to make room for extra floor space.

waldorf homeschool room


And, speaking of things that can be hidden away...  I disguise many unsightly things in the big white cabinet.
When the doors are open, it's actually a computer desk! I love that I can close the doors and hide things like the printer and the laminator (both things I love to have, but that I don't love to look at).
I found this particular one on Overstock.com. 

waldorf homeschool room

I love curriculum, books and educational materials. As a result I have stock piled WAY too much of it. Between my days in college earning my teaching credential, my years as a reading intervention teacher and now as a I enter my 4th year as a homeschooler, I have managed to acquire quite a collection!


Someday I fully intend to sort through my stash, and hopefully get rid of  lot of it. But, for now it all stays with us, suspended in state of "organized" chaos.  
Books and curriculum that are not in regular use are stored in the closet.  Meanwhile, the resources that are in regular rotation stay in a simple cube shelf next to my desk.

waldorf homeschool room
I love having over-the-door shoe rack inside the closet door (pictured above). It is a great way to store small things like art supplies, pencils (and so on). I love that it is made of natural material (and not cheap plastic). But, my only regret is that I didn't get one with clear pockets, like this:


The cube shelf is something that you can find at just about any big box store, or online. You can also get canvas bins made to fit in the cubes which are nice to have. Mine is similar to this...


I like that the back isn't solid because I can have access to the electrical outlet behind it.

And, speaking of storage, I still have two "littles" in the mix, who don't have very long attention spans! So, I keep a stash of puzzles and busy bags on hand for them to use while I work with my oldest. They are all easily accessible, while simultaneously stored out of sight in a wooden (Ikea) shelf. 


The puzzle rack on the top right has been a life saver. I like that it's easy for my kids to clean up the puzzles themselves, and that it's made of natural wood. This is the one I have: 

`

No children's' space would be complete with a little bit of whimsy. I've added this throughout the room with simple additions like lighting, wool felt garlands, and more.


I LOVE lighting. It can really make or break a space. One way that I brightened up a dark corner of this room, was by draping string lights over a shelf bracket mounted on the wall. The trick to this is, to use lights with a white cord (not a standard green one).


For an easy on/off situation with my collection of lights, I have everything plugged into switches. 


But, any power strip (with a master switch) will do. You'll be more likely to use all the lighting if it's easy to turn it all on at once!

The element of subtle whimsy continues as you move through the room...


I am very inspired by Waldorf education, and incorporate elements of this theory into my homeschooling (like with the "math gnomes" pictured on the bulletin board below). 


I was an Art major in college, so I still have a lot of my old supplies. Plus we enjoy crafting and creating. So, here are some photos of how I keep all the gear, supplies (and, let's face it... "the mess") corralled.

 
Luckily the back section of the room even has a linoleum floor for easy clean up!


You may notice (in the picture above) my solution to having a place for works of art to dry. When I looked for drying racks, all that I could find were giant racks made for entire classes' worth of work. So, instead I use a wooden shoe rack, and it works great! 


Also, Ikea's easel is just as good as the more expensive versions!

And, in closing I'll leave you with a few more "Before and Afters" just for fun.

Before

After


Before


After


Before


After

I hope that you feel inspired after scrolling through this post! Please feel free to leave me any comments or questions you have. Also, if you do a post on your homeschool space please leave a link. I love peering into the spaces that others have created!


That's all! Thanks for stopping by!


Linking up to these fun parties and round ups:

http://www.flourmewithlove.com/2016/08/mix-it-up-monday.html

SaveSaveSaveSave