google-site-verification: googlef2ba99a3ab5aecea.html
Showing posts with label Seasonal Decorating. Show all posts

Monday, October 26, 2015

DIY Creepy Halloween Haunts

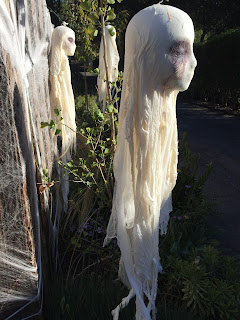
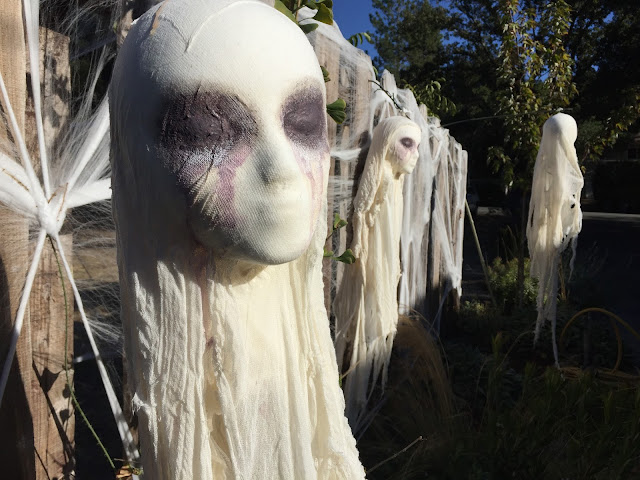
I tried to make non-scary Halloween decorations, but I failed. These things are SO creepy!

At least the kids don't seem to be too afraid of them.


Here's the basics of how I made these easy creepy haunts:

cheesecloth ghost


I came across this tutorial, from Martha Stewart... oh how I love Martha. She calls these creations "Cheesecloth Spirits", which sounded pretty tame to me. Here's what her version looks like:


I decided to give it a try! First I found the wig heads, for much cheaper on Amazon than the sources listed in the original tutorial. Because it's always good to use odd number grouping when decorating, I ordered 3.


I followed the directions on the tutorial, using a mixture of watered down Stiffy, and craft glue. But, it would work just as well with some outdoor mod podge.


To apply it I used a cheap foam brush. You could probably just use a sponge too.


This is a messy job, and you'll need LOTS of cheesecloth. I'd plan on at least several yards per "spirit". Start by placing a piece of cheesecloth over your Styrofoam head, coat with outdoor mod podge.


Continue to layer on more sheets of cloth, ripping the ends to give it an erie look.

But, once these were dry, the looked too plain to me. There wasn't much definition in the face, so I decided to bring more attention to the eyes.

cheesecloth ghost

Using watered down acrylic paint, I added deep purple to the eye area. Because it was so watered down, it dripped down the face and into the folds of the fabric, causing a super erie "bloody tears" effect. You could use blood red, but I prefer subtlety suggestive halloween decorations. Overdoing it on the "blood and guts" always seems like kind of an easy cop-out to me. Subtle is creepier.


But, I have little kids in the house, and they looked a bit too creepy. So I decided to try to tone down the freaky factor a little bit.

cheesecloth ghost

For slight sparkle and texture I applied some mica flake medium that I had on hand.


I also covered up some of the dark purple with plain white acrylic. They were a little less disturbing after this.

cheesecloth ghost

Time for them to find a home!

I glued/ screwed white cup hook into the top of each head, and suspended them from small bamboo sticks.


cheesecloth ghost

Be sure you really rip up the cheesecloth at the bottom, so that there is plenty of extra fabric to flutter in the wind.


cheesecloth ghost cheesecloth ghost

I tossed a couple of strands of christmas lights in the bushes bellow these cheesecloth ghosts, because up-lighting is always spooky, and they were ready for fright night!

cheesecloth ghost


Happy Halloween!


Also, if you like DIY decorations as much as I do, you may enjoy this post:


Thanks for stopping by!


Linking up to these fun crafting blog parties:


http://www.flourmewithlove.com/2015/10/mix-it-up-monday-blog-party-without_25.html
http://www.funkypolkadotgiraffe.net/2015/10/too-cute-tuesday-linky-par-tay-256.html
http://myuncommonsliceofsuburbia.com/inspire-me-monday-83/
http://www.tipjunkie.com/post/tip-me-tuesday-happy-crafters-share-10-27/
http://cornerstoneconfessions.com/2015/10/titus-2-tuesday-179.html
http://thecraftyblogstalker.com/create-link-inspire-linky-party-100/
http://www.carolynshomework.com/2015/10/the-inspiration-board-creative-party_27.html
http://ladybug-blessings.com/?p=6329
http://www.gingersnapcrafts.com/2015/10/wow-me-wednesday-229.html#
http://www.mygirlishwhims.com/2015/10/your-whims-wednesday-234-and-features.html
http://www.savvysouthernstyle.net/2015/10/wow-us-wednesdays-245.html
http://thenymelrosefamily.com/2015/10/whimsy-wednesdays-191.html/2#
http://thehappyhousie.porch.com/delicious-fall-desserts/
http://thewinthropchronicles.com/2015/10/share-it-link-party-190/
http://justagirlandherblog.com/hit-me-with-your-best-shot-91/
http://thediydreamer.com/from-dream-to-reality/come-on-over-and-show-off-your-stuff-fdtr-190/
http://www.posedperfection.com
http://bloomdesignsonline.com/2015/10/lovely-little-link-party-49.html
http://staceyembracingchange.com/2015/10/29/creative-inspirations-linky-party-161/
http://www.artsyfartsymama.com
http://www.coloursaturatedlife.com/6-fabulous-fall-decor-ideas-brag-worthy-link-party-3/
http://livelaughrowe.com/around-the-house/


     style="display:block"
     data-ad-client="ca-pub-1259762351787524"
     data-ad-slot="8522386894"
     data-ad-format="auto">


Tuesday, June 2, 2015

Easy Summer Decor

I know it's not officially summer yet. But, the kids are out of school, and we're all ready for summer to start!


So, I decided it was time to pack up my spring decorations and create some new ones for summer. After the frills and flowers of my spring decor, I really wanted my summer decorations to be clean, light and simple.
Because it was easy and quick, I went with a beach/ nautical theme.

One of the first things I did was dress up some glass vases with jute rope. I found my rope at the craft store, but you could probably find it for less at a hardware store.


Then I simply hot glued the rope around the base of each vase.


I wound the rope around the vases, gluing as I went. This was vey easy and quick.


This could be used on a multitude of glass containers. You could use interesting bottles, mason jars or even inexpensive cups.


Then, using this tutorial as my guide, I created a beachy monotone wreath.


This turned out to be very time consuming, and (for me personally) dangerous! While cutting a stack of fabric, I slipped and cut my finger with my sewing scissors. Four stitches later, I'm here to tell the tale.
So, please be careful!


I used 3 old sheets (from the goodwill) for this project. They weren't exaclty the same color. So, as one shade of white neared the next I began "blending in" pieces of the next shade. That way they would fade into one another. This project took a total of 1000 dressmaker pins.


And: 1 white foam wreath.

Then I made another wreath for our front door. This one went much faster!


This was just plain brown paper (folded into thirds), wrapped and then hot glued onto a styrofoam wreath. I have a big roll of brown paper that I use for all kinds of things.


 (if you don't want that much paper, here is a smaller one, or you could even use grocery bags).


The shells and driftwood are from the craft supply store (or you could just find some at the beach!).

While at the craft supply store, I saw these plain wood blocks. I love using natural materials, and wanted to work them into my summer decorations. So, I just decided to paint letters on them, and to spell out "summer". Then I added them to my display them on the mantel.


I freehanded the letters using acrylic paint (titanium white). Then to bring out the woodgrain I polished them using my homemade Beeswax polish.

Then I went around the house gathering things that were beach related or matched my grey/ light wood pallet. I arranged them on the mantel.


The large mirror came from Target (similar color framed mirror).

I have a big glass bowl that I also like to change with each season. For summer I decided to make it into an "under sea" scene. I decided to fill it with some sand (from the kids sandbox out back!), shells, coral, artificial succulents and driftwood. If I can find a way to add "fish" (without it looking too hokey), I'd like to do that too.


I used a round rope mirror (similar) as a backdrop, and added a pair of fake plants from Ikea in a grey-green tone.

Then came to really easy part! If you're not a crafter, this is one thing you can do to add a summer decorations without having to make anything! I just took some more shells and scattered them through the house.


I sprinkled them onto shelves and in bookcases.
*Also something to note... I like to organize my books by shape and color.


I even tucked them into this wreath.


Then, I combined shells with interesting worn wood. For similar wood, try your pet store's reptile supply section. This particular piece was meant to go in a lizard's cage!


Or, an online supplier of natural materials is save-on-crafts. They have great prices (but will get you on the shipping, so check to see if they have a location near you where you can pick up your order).

That's all!
Thank you for stopping by, and have fun with your summer decorations!


Linking up to these fun parties!

http://ladybug-blessings.com/?p=5823
http://romantichome.blogspot.com/2015/06/summer-decoration-show-and-tell-friday.html


     style="display:block"
     data-ad-client="ca-pub-1259762351787524"
     data-ad-slot="8522386894"
     data-ad-format="auto">
Thursday, May 28, 2015

Waldorf Inspired Seasonal Wheel Calendar

*Updated*

School has started again, and that has got me thinking a lot about our homeschool space. One thing that needed a little revamp was our seasonal wheel calendar.

wheel calendar waldorf

I made this a while back, and it had started to flop and bend over time. So I implemented a few minor changes, and put it back on the wall (for another go-around!).

Detailed below is my original DIY/ Tutorial, with the addition of the newest changes and improvements. Also, here is a photo of where it is in our homeschool room this year. The seasonal wheel is tucked into a cozy corner above one of our work spaces.

waldorf homeschool room

*Side note: I love the desk pictured above, because it folds up to save space!


Enjoy!

Thursday, May 28, 2015

For many people the time to start an new calendar is at the start of a new year. But the neat thing about this calendar is that you can start using it anytime!

wheel calendar


In the spirit of Waldorf Education I wanted to create a seasonal wheel calendar for our homeschool space. In addition to this, we do use a traditional calendar. But, my goal with this was to use the wheel format to illustrate the circular nature of the yearly rhythm. I chose only to include the months and the seasons, so that I could continue to use it year after year. But, you could make an even more elaborate version that included days and/ or dates by simply adding another inner circle.


I don't know if this is a "traditional" aspect of Waldorf Education, but it has the general feel. 
*Although I love Waldorf education and am heavily influenced by it, I am not a Waldorf purist, or expert. 

To make this project I used the following materials:

-2 sheets of Bristol Board


-White Glue


-Scissors

-1 Mini Brad


-Colored pencils (my favorite brand is Prismacolor, but Lyra makes a nice set too).


-A compass


-A standard pencil


-An eraser


-A long straight edge or ruler


-1 piece of cardstock or cardboard (at least as large as your pieces of Bristol Board). The back of a pad of drawing paper, or even part of a cereal box will work well.


I gathered my supplies, and on one of my pieces of bristol board, I begin constructing my wheel.
Bristol Board is similar to cardstock, but it is a little heavier and (if you get a smooth version) is lovely for drawing with pencil. I also like that it holds up well to lots of erasing and gluing (unlike traditional drawing paper).


The first step was to create two circles. Using the compass I made one outer circle that would serve as the edge of the wheel. I didn't measure and exact width. Rather I just made it as wide as the size of the paper would allow. 
The I moved the compass in about 1/2"-3/4" (again, this measurement can be flexible). I placed the point of the compass in the exact same place in the center of the circle and lightly drew an inner circle. This would serve as my guide for writing the names of the months around the edges. 

Then came the challenging part. This might be easy for you if you're good at geometry, but it took me a few times to get it right. So if you're like me, draw lightly!
First I divided the circle into 4 equal parts, starting from the center. Each of these triangular sections would be the space for a seasonal tree illustration. After that I divided each of those sections into 3 equal parts, creating even spacing for the names of the months. This then left me with 12 equal pieces marked off around the perimeter of the circle. 


Then it was time to add some color. I started by writing the 12 months around the perimeter (in the 2nd circle I had created). Before I "committed" anything with colored pencil I wrote it all out lightly with regular graphite. Colored pencil will erase a little bit, but not entirely, and not as well as graphite. 
I also lightly colored in the area with the colors of the rainbow, using cooler colors like blues and greens for the winter months, and warmer colors like reds and oranges for the summer months. I used this image as a reference guide: 

photo credit


As one color transitioned into another I faded them together. The easiest way to do this is to use a lighter touch where the colors will blend together, eventually fading lightly into white. Then, pick up your next color and lightly draw over the last one, gradually increasing the pressure to make add more pigment to the paper. 
Next, I went over the names of the months with a dark brown colored pencil.


Then it was time to draw a tree, four times (once for each season). The good news is that you don't have to be an artist to do this! A simple Google image search (seasons tree illustration) will reveal a wealth of inspiration and references. You could use these as references for your own drawings, or even just print out an image and glue it onto your wheel.

For my project I was inspired by this lovely image:

photo credit

Using the image as a guide, I freehanded four basic trees with my colored pencils. 


I started by drawing the trunks and branches. I added dark blue shadows to the "cold" season trees, and dark brown shadows to the "warm" season trees. Then I chose colors that represented each season and simply made circles of various sizes over the branches. 


In the center of the circle I drew a combination sun/ moon for added interest.  It would also be neat to draw a star, or a compass rose in the center. 


Then I cut out the entire circle, and also cut out an identical circle from another blank piece of bristol board. For extra strength I glued the blank circle onto the back of my calendar wheel.  I fashioned the pointer from a scrap of paper, colored it, and glued it to the background.

Over time, this did not prove to be strong enough, and it started to flop, and bend. So, I added the extra circle of (thin) cardboard to the back. 


I just used the backing from an old pad of drawing paper and glued it to the reverse side of the wheel. 


Make it spin!

Lastly I pushed a small brad through the center of the wheel and through the back of a brown piece of card-stock paper.

I simply stapled it to the wall in our homeschool area. We enjoy turning the wheel slightly every couple of weeks as the months go on. It serves as a great visual reference for learning about the months and seasons of the year!

Thanks for stopping by, and Happy Crafting!


wheel calendar waldorf


If you are interested in Waldorf, nature crafts and/or related topics, you may enjoy these posts:


Thanks for stopping by!


Linking up to these fun parties:

http://strangersandpilgrimsonearth.blogspot.com/2015/06/the-art-of-home-making-mondays-please.html


Wednesday, September 24, 2014

Dried Apple Garland Tutorial


For a fun and festive touch of fall, create your own dried apple garland!


A few days ago, I found myself with an abundance of apples, so I decided to make canned applesauce. But, during the process I came up with another idea.
Using slices of apples, I made a dried apple garland to decorate our home.

Before


During

After

Here's the How To:

Slicing

I cut slices directly around the core. So that they would be easier to string I made them pretty thick. They were roughly 1/4" to 1/8' thick. I tried to keep them as uniform as possible. 

I alternated which direction I cut the apples, sometimes slicing them longways (so that to stem remained). Other times I cut from the side, in order to reveal the star shape made by the seeds.

Baking

Then I lined cookie sheets with parchment paper and laid the slices out.


Then I placed them in the oven, on a low 240 degree heat.


While they were baking I used the time to make canned applesauce (link to that post)

The apple slices need to bake for a long time. After about 1 1/2 hours I pulled them out and flipped them all over.


Then I let them bake for about 2 more hours. I checked them periodically to be sure they weren't getting too dry. You want them to still feel a little spongy. If they are too dry, then you wont be able to thread them later, because they will just crack.
Finally, remove the cookie sheets from the oven and allow them to cool for a few minutes.


Stringing

To thread the dried apples together I used a large sewing needle and embroidery thread. 


Tie several knots at the end to keep the apples in place, and gently push the needle through the slices.


Sometimes I alternated between sliced that had been cut longways, and slices that had been cut sideways.


Finish off the end with another couple of knots, hang, and enjoy!


Over time they will slowly dry even more, and soon you will have a beautifully preserved garland to enjoy!


I love the way the sunlight makes the star at the center of the apples glow.


Left-Overs Idea

I ended up with way more dried apples than I needed for this project (I made a lot of applesauce!). But rather than tossing them, I decided to use them in our autumn "nature table" display.


Stack dried slices on wooden plates and trays, or place them in a bowl with acorns for a delightful seasonal display!


Thanks for stopping by!

Linking up to these great blogs:

Tuesday

http://www.pintsizedbaker.com/2014/09/two-cup-tuesday-no91.html
http://thecraftyblogstalker.com/create-link-inspire-linky-party-44/