google-site-verification: googlef2ba99a3ab5aecea.html
Showing posts with label Home Improvement. Show all posts

Sunday, May 31, 2015

Budget Kitchen Makeover

Sticking with my theme of flashing back to our first home (and the changes we made there) today we're visiting my old kitchen.
Don't be too afraid of the "before" photos!


As with the rest of this little house, when we first bought the home the kitchen was disgusting! 
The little two-bedroom had been a student rental, with anywhere from 6-8 men sharing it at one time. It had seen a lot of parties, and very few cleanings (if any)!

But, hidden underneath all of the grime was it's original 1928 charm!

Some "Before" Photos:

Original cold storage "before" 

Stove area "before"

While others were apparently able to function in this kitchen, couldn't! Unfortunately, it wasn't in our immediate budget to remodel this room. But with a little creativity we did make some quick changes.
The very first thing we did was clean! Then, the next step was to paint. I painted every surface except for the tile and the floor. I chose a soft yellow for two walls, and used "ultra pure bright white" (right off the shelf) for the rest.
We were on a budget and I wanted to stick with a retro look, so we decided to go with a checkerboard pattern for the floor.
The most economical and easiest solution was to go over the existing linoleum. I found these peel and stick floor tiles on ebay. They were inexpensive and easy to apply. All you need is a box cutter, straight edge and a clean surface to stick them to.


The next step was a "splurge"on a new refrigerator. Yes, people had been living with this old one:


The old refrigerator was blocking a window, which I didn't want. In order to make room for the new refrigerator in a different location we had to remove one upper cabinet.


Before

After

We purchased the cheapest stainless steel "looking" refrigerator available at Sears. While it wasn't fancy, it did drastically improve the look (and smell!) of the room. We also added simple touches like this reproduction wall clock:


*A side not about the "legs" also pictured above: Yes, I do have nice legs, thank you very much! These came from a friend who used to work at Victoria Secret they were displays). But, these can be yours too, if you have a sense of humor like I do!


The next step was to replace the cruddy old range. The Goodwill was happy to come remove it for us for free. Check your local store to see if they offer this service.
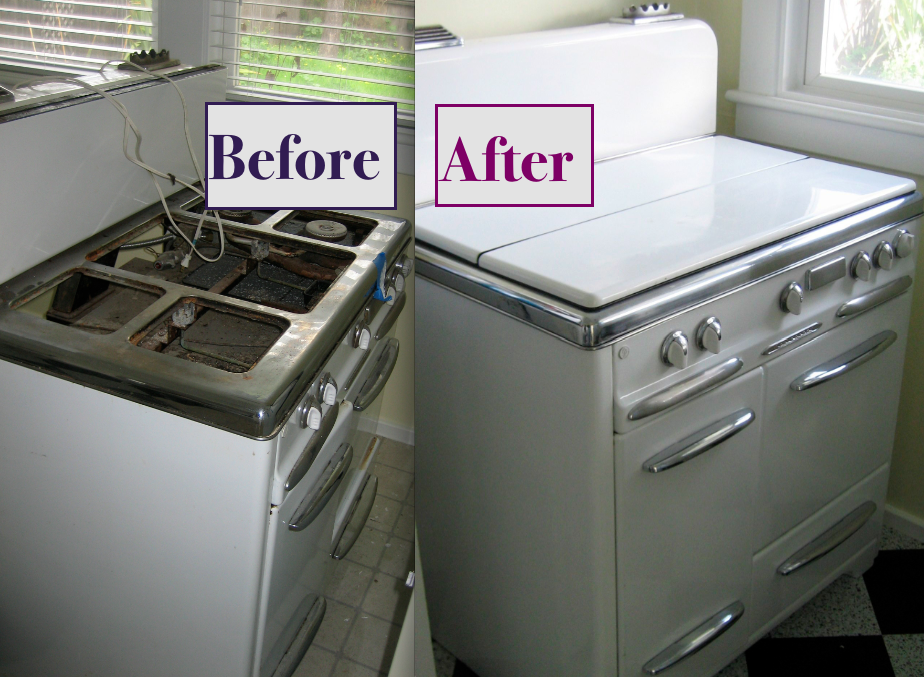
Then, we found a classic used range on Craigslist. It needed some cleaning too!

Before


After

For a more in depth post on this range, and how I made it gleam, please see this post.


To create more storage space in this small kitchen we hung a heavy duty pot rack above the "new" range. In a small space, all possible wall space. Think about adding shelves, racks or even hooks anywhere you can.


Before

After

Using the strip of red tile as my guide, I added red accents. For example, I added the Fiestaware pitcher (see Amazon link below), a curtain on a tension rod (to block the plumbing), and a red butter dish. Then we switched out the old leaky faucet, and painted some of the trim black (where someone had hacked at it with an axe!).


I also replaced the cabinet hardware with drawer pulls I found on sale at Restoration Hardware. It pays to not be too picky, and to shop sales! These were "polished nickel" and while they weren't an exact match to the chrome in the room, they were VERY close.

If you are going for the retro look, another one of my favorite websites to purchase hardware is Rejuvenation.com. Sometimes they also have great sales!


Lastly we added a few flea market finds, like an old breadbox, a chair and a red rolling cart. We also hung these sturdy Ikea shelves.
About a year later we did eventually remodel this room, replacing the cabinetry and making bigger changes. But, I thought it would be important first to show how easily and inexpensively a room can go from "gross" to "cute".
For details on the big remodel of this room, please stay turned for a future post!


Also, for more posts about the transformation of this bungalow, see these other posts:


Thanks for stopping by!


Linking up to these fun parties:

http://thefoleyfam.com/2015/05/sunday-funday-link-up-127-features.html
http://sewmanyways.blogspot.com/2015/05/sew-darn-crafty-link-up-party_31.html
http://www.flourmewithlove.com/2015/05/mix-it-up-monday-blog-party.html
http://carriethishome.com/2015/05/easy-summer-diy-projects-frugal-crafty-home-blog-hop-130/
http://www.raegunramblings.com/2015/05/diy-pillow-cases.html
http://www.sewcando.com/2015/05/junes-first-craftastic-monday-link-party.html
http://www.titicrafty.com/2015/05/bewitchin-projects-block-party-100/
http://diyshowoff.com/category/other/that-diy-party/.
http://madincrafts.com/mad-skills-party-261/
http://www.skiptomylou.org/2015/06/01/made-by-you-monday-241/
http://strangersandpilgrimsonearth.blogspot.com/2015/06/the-art-of-home-making-mondays-please.html
http://myuncommonsliceofsuburbia.com/inspire-me-monday-62/
http://www.abowlfulloflemons.net/2015/06/one-project-at-a-time-june-2015.html
http://www.tipjunkie.com/post/tip-me-tuesday-happy-crafters-share-6-2/
http://cornerstoneconfessions.com/2015/06/titus-2-tuesday-158.html
http://www.sugarbeecrafts.com/2015/06/show-and-tell-link-party-time-12.html
http://thecraftyblogstalker.com/create-link-inspire-linky-party-79/
http://www.carolynshomework.com/2015/06/the-inspiration-board-creative-party.html
http://ladybug-blessings.com/?p=5823

Friday, May 29, 2015

Living Room Makeover


It's flashback Friday here at Leaving the Ivory Tower. Today, we're traveling back in time to when we bought our first house. This tiny 900 square foot beach bungalow was the cheapest home in town, and it showed!

The home had been a rental for college students, and had seen her fair share of parties. But, we saw that she had "good bones" and great potential.

It took a little (actually a lot) of TLC, but eventually she shined and was even featured on national TV!


beach bungalow


Today we're stepping into the living room for a details about the changes we made there. Join me for a "budget friendly" living room remodel!


Before


Sadly neglected, this foreclosure had seen better days.  Carpets were stained, windows were broken, and there was even a crack-pipe laying in the (weed covered) yard.

But, we saw that despite the neglect, she still possessed many of her subtle charms.  An archway lead to the dinning room, and thick wood trim still lined the windows.

The carpet was covered with burn marks, beer stains and who knows what else!


Carpet, before


Carpet, before


Can you tell where their couch was?!


Living room floor, before


We suspected there might be good things hidden underneath that gross carpet. So, one of the first things we did was pull up a corner of the carpet (it was actually only a few years old!).

Much to our delight, we discovered the original heart Douglass Fir wood floors hidden underneath!  

This is often the case in older homes (this one was built in 1928).  So if the carpet is in poor condition, like this was, see if you can sneak a peak underneath.  It's easy to (inconspicuously) pull up a corner to look.

Original wood floor, before


We knew the wood floors would need refinishing, so I quickly started painting the walls.  When "flipping" a room, it's best to work from "top to bottom" (starting with the ceiling).  This way I didn't have to worry about dripping paint on the floor, because I knew it would just get sanded off during the refinishing process.

Because I like bold color, and because the style of the home lent itself fun choices, I went for a bright cheerful green for the walls.  It was essentially the color of wasabi!


Wasabi Green!


Next, I painted the 4th wall (the one with an open arch leading to other rooms) white.  Because I wanted a crisp clean look, I just used the standard out-of-the-can "ultra pure bright white".


Then, it was time to refinish the floors. This was one of the things we splurged on. We brought in a professional. You can rent a sander and do this job yourself.  But for DIYer's (like us) I wouldn't recommend it because upright sanders can be tricky to control.


Floor refinishing process


They sanded through old floor, old finish and replaced a few rotten boards.  Even though they draped the house in plastic, this still made a HUGE mess.  There was a fine layer of sawdust everywhere!


Wet finish on floors


Also, note that the finish they put on the floors has a very strong chemical smell that lingered for a couple of days. We were living there, and I was pregnant, so it was not pleasant. If you can, stay away during this time!


Before


After


To hide some of the flaws that remained, and because I like to look, I chose the darkest stain available.


Then it came time to add furnishings and decor...


Before


After


Because the room was so small, we opted for a red love seat (purchased from a local furniture store) in place of a full sized sofa.  Red and green are complementary colors, so this worked well with the vibrant walls.  Also, smaller scale apartment sofas, are perfect for small spaces.

We also hid our TV inside of an armoire, and used a storage trunk as a coffee table.  In a small house it's important to add storage wherever you can!

Simple sheer white curtains, a dark brown club chair, my own painting and a DIY suitcase table finished off the look.


After


After


I spray painted an ornate hand-me-down mirror red, and we added some sturdy wood shelves from Ikea.

We played around with how the furniture was arranged, and switched around accents.  It was fun to be able to make these small changes.

Overall we were so happy with the end result! Instead of having a a living room that was dreary and depressing, this little house suddenly had one that was bright and cheerful!


Before


After


When we were selling this house we had a neat surprise. The day after we accepted an offer, this house was featured on the Today Show! We still don't know how they found us. But is was pretty cool be be selected and featured on a national TV show, even if it was a day too late to help us with the sale!


Here is the link to watch the Today Show Segment.  There is a short ad.  To see our house featured fast forward to the 1 min 13 second mark.


It was pretty funny to hear Al Roker commenting on my "strong art" (a painting I made in college), and to hear the comments about how there should have been "chunky red cookie jars" in the kitchen... which there were, 3 of them, just off camera!


For more about this house, and our complete bungalow remodel, please stay tuned for future posts. 


Thanks for stopping by!


Also, to see more of the drastic changes we made in this home, please enjoy these other posts as well:


Linking up to these fun parties:

Wednesday, May 6, 2015

Small Yard Outdoor Play Area

    The weather is warming up and it's time to get outside and play!

    But, perhaps you saw my post about creating a natural materials playground in your own yard, and you thought: "that's all well and good... but I just don't have that kind of space in my yard!".  If that's the case, then this post is for you!

    I used to think that dreamy nature inspired outdoor play spaces were only available to people with land, a lot of land.  But, while we lived in our last house, I realized that wasn't necessarily the case.

Hayley Brentmar small yard
Our side "yard"

    
We used to live in a home with a very small outdoor space. Essentially all we had was a narrow patio, and a couple of cramped flower beds along one side of the house. I would get green with envy when I'd see photos of large beautiful yards.

    But, I thought a lot about my options and was able to get creative. In the end I surprised myself with how many fun and inviting options for play we were able to pack into that little area! Many of these ideas you could use even if all you have is a small apartment balcony.


Hayley Brentmar's small yard
Our back "yard"


    When making choices about my children's toys, it is always my preference to stick to natural materials whenever possible, and avoid junky plastic playthings. So, I carried this theme outdoors too.

A Multi-use Playhouse

    Children love to have a place to hide, tinker and experiment. So, using part of our old kitchen cabinets as his base, my husband constructed this small wooden playhouse.


Hayley Brentmar's small yard


    On the side of the playhouse I mounted a child height shelf. The shelf itself was a piece of scrap wood, and the brackets were only a few dollars each at Ikea.


Hayley Brentmar's small yard    To encourage creative play, I filled the shelf with interesting objects from nature (like iridescent abalone shells, rocks and glittering geodes).


    When you are short on space, look to walls and fences! Using regular cup hooks I utilized the nearby wall space to hang wind chimes. I also hung a second set of them from the playhouse itself. Playing with sound doesn't take up much space!


    Then to add some growing green things, I also hung wooden planters filled with cheerful flowers on the back wall of our house. Things like window boxes and hanging planters also work well for this.


    Later, to keep things new and interesting, I mounted a mailbox to the shelf (pictured above). These should be available at your local hardware store. Check to be sure there are no sharp edges.


    I also found 3 metal butterflies at the dollar store, which I spray painted brown and screwed above the door for decoration.


    As time went on I kept an eye out for interesting things to add to our small outdoor play space, trying to keep with the natural materials theme. The carved redwood mushroom pictured above came from a roadside stand near Redwood National Park. But, similar treasures can often be found at garden centers, nurseries or on etsy. I liked that it was made of wood, and had a relatively small footprint. When you're short on space think "tall" and "thin"!
For more details of this playhouse and views of the details inside, please see this post.


Places to Dig

    A friend once reminded me that if our kids weren't getting dirty, then we weren't doing our jobs right. How right she was! Digging in the dirt it fun and therapeutic (for adults too!). In our small yard the kids had two places to dig!


    The first was a sturdy raised sandbox that my husband constructed himself. Because we were so short on space he added wheels to one side, and handles to the other. That way it could be lifted and easily relocated if needed (kind of like a wheelbarrow). 

*Also pictured above: Inexpensive reed fencing hides an unsightly view of the neighbor's Rubbermade shed!


    The bottom of the sandbox was drilled with drainage holes to let the water out, and lined with fiberglass weed barrier, to keep the sand in. Also, because we had many neighborhood cats, who would have loved to use the sandbox as a littler box, he created a mesh lid. The lid was essentially a wooden frame with crosspieces. It was lined in wire mesh, and fit just inside the box.


    Sand toys were kept nearby in wooden baskets. These drain easily, and are readily available for a couple of dollars at most secondhand stores. Over time I eventually replaced most of our plastic sand toys with actual kitchen tools and gadgets, also found at thrift stores. The Goodwill always seems to have a good supply of wooden spoons and wooden baskets! I also kept a small hand broom and dustpan nearby, for the inevitable spillovers. 
    Playsand is easy to find at most big-box toy stores or hardware stores. 

    If cats are an issue for you, and you don't want to have to cover a sandbox after each use, then consider putting in a gravel pit instead. The cats seem to avoid these, and they can be just as much fun for digging as a sandbox!

Hayley Brentmar's small yard


    I chose to locate our gravel pit just around the bend, in our side yard. It was a narrow space, but the kids didn't care!


Gravel Pit "Before"

    
    I pulled weeds, dug down a few inches and lined the pit with weed barrier. 


Gravel Pit "after"


    Then I filled the space with a few bags of pea gravel. I contained it at the edges with prefab "log" garden edging and large shells. Then I built a "willow hut" (but more about that below!).


    Add some bright flowers and a few sand toys, and you're all set to play!


A Shady Retreat

    I am so inspired by the images I see around the internet of living willow structures, and willow huts! In the early spring there are several online retailers who will sell live willow rods. They are marketed as being for making these neat outside creations. There are also numerous online tutorials on how to do so.
    But, I decided I wanted to make one in the middle of the summer, and I didn't want to wait until spring for supplies (plus I was working on a budget!).

So I created my own version!

    I decided to blend it into the gravel pit, to make the space more intriguing and multidimensional. So, I tucked it into a corner of our side yard.

Willow Hut "before"

    
    Using some decorative sticks from Ikea (you could probably find them at craft stores, or places like saveoncrafts.com too), jute twine, and long flexible sticks cut from nearby trees, I crafted a "hut". About half of the decorative dry twigs snapped, but the ones cut from trees worked really well. I didn't have a method per say, rather it was just a process of trial and error until I got the shape I was looking for.


Hut "after"

    
    Then I covered the floor with small size wood bark and planted non-poisonous flowers like nasturtiums and sunflowers. Eventually the sunflowers got so tall that they drooped over the top of the hut, perfect! Also, in the corner I planted a honeysuckle vine. This fast growing plant eventually grew to cover the top of the hut. And speaking of sunflowers...


Hayley Brentmar's small yard


    Giant sunflowers can actually be great for small yards! They are tall, thin, dramatic and a delight for children! They are easy to grow from seeds, and can get really tall. As you can see mine were tied to the (6 ft high) to keep them from toppling over! I only wish they lasted all year long.


    Remember to save a few of the blooms, and let them dry out.


    You can use the seeds to plant a new crop next year!


A Container Fairy Garden

    Fairy gardens are great for small yards or even balconies, because they are by their very nature small. The whole fun of creating and using these little worlds is in the fact that everything is miniature. We made ours in half of a wooden wine barrel (look for them at garden stores), but you can use any permeable container. Search Pinterest for thousands of ideas.


    I have an entire post dedicated solely to this tiny garden, and the changes it has undergone over time. To see much more about the process and detailed photos, please see this post:

Click here for Fairy Herb Garden tutorial


    Also, tucked away into another corner I created a labyrinth for the kids to enjoy. Details and a DIY tutorial can be found by clicking the link below:

Labyrinth Compas Tutorial: Here


    If you are interested is seeing more outdoor space inspiration, please clink the link below to see how I created a natural materials play space in a larger yard.  Many of these ideas can also be incorporated into small spaces.


    One last thing to think about if you're making choices about hardscaping... A curving path that meanders slowly through your garden is more interesting that a straight one.  So, consider curving your walkways.


    Thank you for stopping by, and have fun outside... no matter what size your outdoor space is!


Linking up to these great parties:

http://justagirlandherblog.com/hit-me-with-your-best-shot-66/
http://www.shabbynest.blogspot.com/2015/05/frugal-friday.html