google-site-verification: googlef2ba99a3ab5aecea.html
Showing posts with label waldorf. Show all posts

Thursday, May 28, 2015

Waldorf Inspired Seasonal Wheel Calendar

*Updated*

School has started again, and that has got me thinking a lot about our homeschool space. One thing that needed a little revamp was our seasonal wheel calendar.

wheel calendar waldorf

I made this a while back, and it had started to flop and bend over time. So I implemented a few minor changes, and put it back on the wall (for another go-around!).

Detailed below is my original DIY/ Tutorial, with the addition of the newest changes and improvements. Also, here is a photo of where it is in our homeschool room this year. The seasonal wheel is tucked into a cozy corner above one of our work spaces.

waldorf homeschool room

*Side note: I love the desk pictured above, because it folds up to save space!


Enjoy!

Thursday, May 28, 2015

For many people the time to start an new calendar is at the start of a new year. But the neat thing about this calendar is that you can start using it anytime!

wheel calendar


In the spirit of Waldorf Education I wanted to create a seasonal wheel calendar for our homeschool space. In addition to this, we do use a traditional calendar. But, my goal with this was to use the wheel format to illustrate the circular nature of the yearly rhythm. I chose only to include the months and the seasons, so that I could continue to use it year after year. But, you could make an even more elaborate version that included days and/ or dates by simply adding another inner circle.


I don't know if this is a "traditional" aspect of Waldorf Education, but it has the general feel. 
*Although I love Waldorf education and am heavily influenced by it, I am not a Waldorf purist, or expert. 

To make this project I used the following materials:

-2 sheets of Bristol Board


-White Glue


-Scissors

-1 Mini Brad


-Colored pencils (my favorite brand is Prismacolor, but Lyra makes a nice set too).


-A compass


-A standard pencil


-An eraser


-A long straight edge or ruler


-1 piece of cardstock or cardboard (at least as large as your pieces of Bristol Board). The back of a pad of drawing paper, or even part of a cereal box will work well.


I gathered my supplies, and on one of my pieces of bristol board, I begin constructing my wheel.
Bristol Board is similar to cardstock, but it is a little heavier and (if you get a smooth version) is lovely for drawing with pencil. I also like that it holds up well to lots of erasing and gluing (unlike traditional drawing paper).


The first step was to create two circles. Using the compass I made one outer circle that would serve as the edge of the wheel. I didn't measure and exact width. Rather I just made it as wide as the size of the paper would allow. 
The I moved the compass in about 1/2"-3/4" (again, this measurement can be flexible). I placed the point of the compass in the exact same place in the center of the circle and lightly drew an inner circle. This would serve as my guide for writing the names of the months around the edges. 

Then came the challenging part. This might be easy for you if you're good at geometry, but it took me a few times to get it right. So if you're like me, draw lightly!
First I divided the circle into 4 equal parts, starting from the center. Each of these triangular sections would be the space for a seasonal tree illustration. After that I divided each of those sections into 3 equal parts, creating even spacing for the names of the months. This then left me with 12 equal pieces marked off around the perimeter of the circle. 


Then it was time to add some color. I started by writing the 12 months around the perimeter (in the 2nd circle I had created). Before I "committed" anything with colored pencil I wrote it all out lightly with regular graphite. Colored pencil will erase a little bit, but not entirely, and not as well as graphite. 
I also lightly colored in the area with the colors of the rainbow, using cooler colors like blues and greens for the winter months, and warmer colors like reds and oranges for the summer months. I used this image as a reference guide: 

photo credit


As one color transitioned into another I faded them together. The easiest way to do this is to use a lighter touch where the colors will blend together, eventually fading lightly into white. Then, pick up your next color and lightly draw over the last one, gradually increasing the pressure to make add more pigment to the paper. 
Next, I went over the names of the months with a dark brown colored pencil.


Then it was time to draw a tree, four times (once for each season). The good news is that you don't have to be an artist to do this! A simple Google image search (seasons tree illustration) will reveal a wealth of inspiration and references. You could use these as references for your own drawings, or even just print out an image and glue it onto your wheel.

For my project I was inspired by this lovely image:

photo credit

Using the image as a guide, I freehanded four basic trees with my colored pencils. 


I started by drawing the trunks and branches. I added dark blue shadows to the "cold" season trees, and dark brown shadows to the "warm" season trees. Then I chose colors that represented each season and simply made circles of various sizes over the branches. 


In the center of the circle I drew a combination sun/ moon for added interest.  It would also be neat to draw a star, or a compass rose in the center. 


Then I cut out the entire circle, and also cut out an identical circle from another blank piece of bristol board. For extra strength I glued the blank circle onto the back of my calendar wheel.  I fashioned the pointer from a scrap of paper, colored it, and glued it to the background.

Over time, this did not prove to be strong enough, and it started to flop, and bend. So, I added the extra circle of (thin) cardboard to the back. 


I just used the backing from an old pad of drawing paper and glued it to the reverse side of the wheel. 


Make it spin!

Lastly I pushed a small brad through the center of the wheel and through the back of a brown piece of card-stock paper.

I simply stapled it to the wall in our homeschool area. We enjoy turning the wheel slightly every couple of weeks as the months go on. It serves as a great visual reference for learning about the months and seasons of the year!

Thanks for stopping by, and Happy Crafting!


wheel calendar waldorf


If you are interested in Waldorf, nature crafts and/or related topics, you may enjoy these posts:


Thanks for stopping by!


Linking up to these fun parties:

http://strangersandpilgrimsonearth.blogspot.com/2015/06/the-art-of-home-making-mondays-please.html


Wednesday, May 6, 2015

Small Yard Outdoor Play Area

    The weather is warming up and it's time to get outside and play!

    But, perhaps you saw my post about creating a natural materials playground in your own yard, and you thought: "that's all well and good... but I just don't have that kind of space in my yard!".  If that's the case, then this post is for you!

    I used to think that dreamy nature inspired outdoor play spaces were only available to people with land, a lot of land.  But, while we lived in our last house, I realized that wasn't necessarily the case.

Hayley Brentmar small yard
Our side "yard"

    
We used to live in a home with a very small outdoor space. Essentially all we had was a narrow patio, and a couple of cramped flower beds along one side of the house. I would get green with envy when I'd see photos of large beautiful yards.

    But, I thought a lot about my options and was able to get creative. In the end I surprised myself with how many fun and inviting options for play we were able to pack into that little area! Many of these ideas you could use even if all you have is a small apartment balcony.


Hayley Brentmar's small yard
Our back "yard"


    When making choices about my children's toys, it is always my preference to stick to natural materials whenever possible, and avoid junky plastic playthings. So, I carried this theme outdoors too.

A Multi-use Playhouse

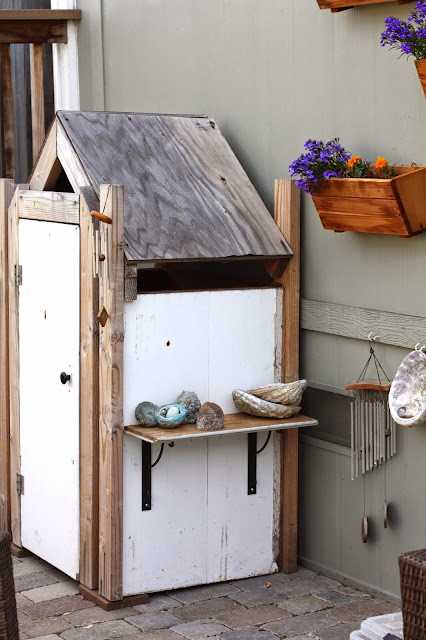
    Children love to have a place to hide, tinker and experiment. So, using part of our old kitchen cabinets as his base, my husband constructed this small wooden playhouse.


Hayley Brentmar's small yard


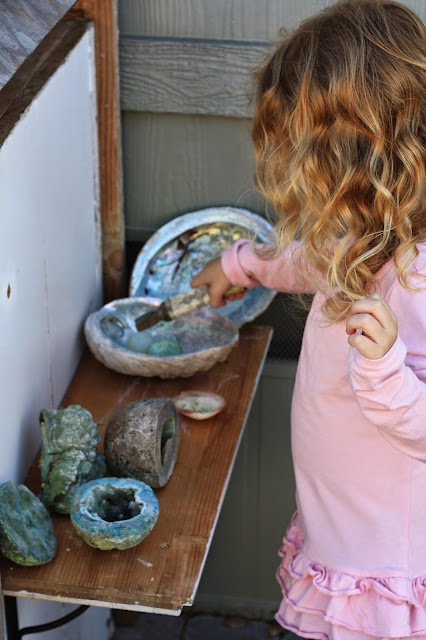
    On the side of the playhouse I mounted a child height shelf. The shelf itself was a piece of scrap wood, and the brackets were only a few dollars each at Ikea.


Hayley Brentmar's small yard    To encourage creative play, I filled the shelf with interesting objects from nature (like iridescent abalone shells, rocks and glittering geodes).


    When you are short on space, look to walls and fences! Using regular cup hooks I utilized the nearby wall space to hang wind chimes. I also hung a second set of them from the playhouse itself. Playing with sound doesn't take up much space!


    Then to add some growing green things, I also hung wooden planters filled with cheerful flowers on the back wall of our house. Things like window boxes and hanging planters also work well for this.


    Later, to keep things new and interesting, I mounted a mailbox to the shelf (pictured above). These should be available at your local hardware store. Check to be sure there are no sharp edges.


    I also found 3 metal butterflies at the dollar store, which I spray painted brown and screwed above the door for decoration.


    As time went on I kept an eye out for interesting things to add to our small outdoor play space, trying to keep with the natural materials theme. The carved redwood mushroom pictured above came from a roadside stand near Redwood National Park. But, similar treasures can often be found at garden centers, nurseries or on etsy. I liked that it was made of wood, and had a relatively small footprint. When you're short on space think "tall" and "thin"!
For more details of this playhouse and views of the details inside, please see this post.


Places to Dig

    A friend once reminded me that if our kids weren't getting dirty, then we weren't doing our jobs right. How right she was! Digging in the dirt it fun and therapeutic (for adults too!). In our small yard the kids had two places to dig!


    The first was a sturdy raised sandbox that my husband constructed himself. Because we were so short on space he added wheels to one side, and handles to the other. That way it could be lifted and easily relocated if needed (kind of like a wheelbarrow). 

*Also pictured above: Inexpensive reed fencing hides an unsightly view of the neighbor's Rubbermade shed!


    The bottom of the sandbox was drilled with drainage holes to let the water out, and lined with fiberglass weed barrier, to keep the sand in. Also, because we had many neighborhood cats, who would have loved to use the sandbox as a littler box, he created a mesh lid. The lid was essentially a wooden frame with crosspieces. It was lined in wire mesh, and fit just inside the box.


    Sand toys were kept nearby in wooden baskets. These drain easily, and are readily available for a couple of dollars at most secondhand stores. Over time I eventually replaced most of our plastic sand toys with actual kitchen tools and gadgets, also found at thrift stores. The Goodwill always seems to have a good supply of wooden spoons and wooden baskets! I also kept a small hand broom and dustpan nearby, for the inevitable spillovers. 
    Playsand is easy to find at most big-box toy stores or hardware stores. 

    If cats are an issue for you, and you don't want to have to cover a sandbox after each use, then consider putting in a gravel pit instead. The cats seem to avoid these, and they can be just as much fun for digging as a sandbox!

Hayley Brentmar's small yard


    I chose to locate our gravel pit just around the bend, in our side yard. It was a narrow space, but the kids didn't care!


Gravel Pit "Before"

    
    I pulled weeds, dug down a few inches and lined the pit with weed barrier. 


Gravel Pit "after"


    Then I filled the space with a few bags of pea gravel. I contained it at the edges with prefab "log" garden edging and large shells. Then I built a "willow hut" (but more about that below!).


    Add some bright flowers and a few sand toys, and you're all set to play!


A Shady Retreat

    I am so inspired by the images I see around the internet of living willow structures, and willow huts! In the early spring there are several online retailers who will sell live willow rods. They are marketed as being for making these neat outside creations. There are also numerous online tutorials on how to do so.
    But, I decided I wanted to make one in the middle of the summer, and I didn't want to wait until spring for supplies (plus I was working on a budget!).

So I created my own version!

    I decided to blend it into the gravel pit, to make the space more intriguing and multidimensional. So, I tucked it into a corner of our side yard.

Willow Hut "before"

    
    Using some decorative sticks from Ikea (you could probably find them at craft stores, or places like saveoncrafts.com too), jute twine, and long flexible sticks cut from nearby trees, I crafted a "hut". About half of the decorative dry twigs snapped, but the ones cut from trees worked really well. I didn't have a method per say, rather it was just a process of trial and error until I got the shape I was looking for.


Hut "after"

    
    Then I covered the floor with small size wood bark and planted non-poisonous flowers like nasturtiums and sunflowers. Eventually the sunflowers got so tall that they drooped over the top of the hut, perfect! Also, in the corner I planted a honeysuckle vine. This fast growing plant eventually grew to cover the top of the hut. And speaking of sunflowers...


Hayley Brentmar's small yard


    Giant sunflowers can actually be great for small yards! They are tall, thin, dramatic and a delight for children! They are easy to grow from seeds, and can get really tall. As you can see mine were tied to the (6 ft high) to keep them from toppling over! I only wish they lasted all year long.


    Remember to save a few of the blooms, and let them dry out.


    You can use the seeds to plant a new crop next year!


A Container Fairy Garden

    Fairy gardens are great for small yards or even balconies, because they are by their very nature small. The whole fun of creating and using these little worlds is in the fact that everything is miniature. We made ours in half of a wooden wine barrel (look for them at garden stores), but you can use any permeable container. Search Pinterest for thousands of ideas.


    I have an entire post dedicated solely to this tiny garden, and the changes it has undergone over time. To see much more about the process and detailed photos, please see this post:

Click here for Fairy Herb Garden tutorial


    Also, tucked away into another corner I created a labyrinth for the kids to enjoy. Details and a DIY tutorial can be found by clicking the link below:

Labyrinth Compas Tutorial: Here


    If you are interested is seeing more outdoor space inspiration, please clink the link below to see how I created a natural materials play space in a larger yard.  Many of these ideas can also be incorporated into small spaces.


    One last thing to think about if you're making choices about hardscaping... A curving path that meanders slowly through your garden is more interesting that a straight one.  So, consider curving your walkways.


    Thank you for stopping by, and have fun outside... no matter what size your outdoor space is!


Linking up to these great parties:

http://justagirlandherblog.com/hit-me-with-your-best-shot-66/
http://www.shabbynest.blogspot.com/2015/05/frugal-friday.html


Wednesday, September 24, 2014

Dried Apple Garland Tutorial


For a fun and festive touch of fall, create your own dried apple garland!


A few days ago, I found myself with an abundance of apples, so I decided to make canned applesauce. But, during the process I came up with another idea.
Using slices of apples, I made a dried apple garland to decorate our home.

Before


During

After

Here's the How To:

Slicing

I cut slices directly around the core. So that they would be easier to string I made them pretty thick. They were roughly 1/4" to 1/8' thick. I tried to keep them as uniform as possible. 

I alternated which direction I cut the apples, sometimes slicing them longways (so that to stem remained). Other times I cut from the side, in order to reveal the star shape made by the seeds.

Baking

Then I lined cookie sheets with parchment paper and laid the slices out.


Then I placed them in the oven, on a low 240 degree heat.


While they were baking I used the time to make canned applesauce (link to that post)

The apple slices need to bake for a long time. After about 1 1/2 hours I pulled them out and flipped them all over.


Then I let them bake for about 2 more hours. I checked them periodically to be sure they weren't getting too dry. You want them to still feel a little spongy. If they are too dry, then you wont be able to thread them later, because they will just crack.
Finally, remove the cookie sheets from the oven and allow them to cool for a few minutes.


Stringing

To thread the dried apples together I used a large sewing needle and embroidery thread. 


Tie several knots at the end to keep the apples in place, and gently push the needle through the slices.


Sometimes I alternated between sliced that had been cut longways, and slices that had been cut sideways.


Finish off the end with another couple of knots, hang, and enjoy!


Over time they will slowly dry even more, and soon you will have a beautifully preserved garland to enjoy!


I love the way the sunlight makes the star at the center of the apples glow.


Left-Overs Idea

I ended up with way more dried apples than I needed for this project (I made a lot of applesauce!). But rather than tossing them, I decided to use them in our autumn "nature table" display.


Stack dried slices on wooden plates and trays, or place them in a bowl with acorns for a delightful seasonal display!


Thanks for stopping by!

Linking up to these great blogs:

Tuesday

http://www.pintsizedbaker.com/2014/09/two-cup-tuesday-no91.html
http://thecraftyblogstalker.com/create-link-inspire-linky-party-44/